Setting up a server management panel shouldn't require a PhD in Linux administration. With Panelica, you can go from a fresh Ubuntu 24.04 VPS to a fully managed, production-ready server in under five minutes — with Nginx, Apache, PHP 5.6 through 8.5 (native + Docker shim), MySQL, PostgreSQL, Redis, email, DNS, SSL, and a full security stack all configured and running.
This guide walks you through every step: from choosing the right VPS to logging in to your panel for the first time, adding your first website, and configuring SSL and email. Whether you are a developer spinning up a personal server, a small business owner moving off shared hosting, or a system administrator evaluating cPanel alternatives — this is the complete reference.
Developers, small business owners, first-time server admins, and anyone migrating from shared hosting or legacy panels like cPanel or Plesk. No prior server management experience required.
Prerequisites
Before you begin, make sure you have the following:
- A fresh Ubuntu 22.04 LTS or 24.04 LTS server — minimal install, no existing web server or database stack
- Minimum specs: 1 CPU core, 1GB RAM, 20GB disk (2 cores, 2GB RAM recommended for comfortable use)
- Root SSH access — either direct root login or a user with
sudoprivileges - A domain name (optional but recommended) — you can start without one, but email and SSL work best with a real domain
Recommended VPS Providers
Panelica runs on any Linux VPS, cloud instance, or dedicated server. These providers offer good value for getting started:
From $4.50/mo (CX22: 2 vCPU, 4GB RAM). Best price-to-performance ratio in Europe. Excellent network.
From $6/mo (Droplet: 1 vCPU, 1GB RAM). Simple interface, great documentation, US and EU regions.
From $6/mo (1 vCPU, 1GB RAM). 32 global locations, hourly billing, NVMe storage.
From $3.50/mo. Budget option with strong EU presence. Good for high-traffic sites.
Required Open Ports
Ensure these ports are reachable on your server (or whitelist them in your cloud provider's firewall/security group):
| Port | Service | Required |
|---|---|---|
8443 | Panelica panel (HTTPS) | Yes |
80 | HTTP (web + SSL challenge) | Yes |
443 | HTTPS (web) | Yes |
22 | SSH access | Yes |
25 / 587 | Email (SMTP / Submission) | Optional (email only) |
53 | DNS (BIND) | Optional (DNS server only) |
Panelica's built-in nftables firewall manages these rules automatically after installation. You do not need to configure anything manually.
Step 1: Prepare Your Server
Start with a fresh Ubuntu server. SSH in as root:
ssh root@your-server-ipUpdate the system packages first. This ensures you have the latest security patches and that the installer doesn't encounter conflicts with outdated libraries:
# Update package index and upgrade installed packages
apt update && apt upgrade -y

# Reboot if kernel was updated (optional but recommended)
reboot
If you want to set a hostname for your server (useful if this is a production machine), do it before installing Panelica:
# Set a fully qualified hostname
hostnamectl set-hostname server1.yourdomain.com

# Verify
hostname -f
Set your timezone so logs and scheduled tasks use the correct time:
# Interactive timezone selector
dpkg-reconfigure tzdata

# Or set directly (example: UTC)
timedatectl set-timezone UTC/opt/panelica/. Pre-existing system services will conflict.
Step 2: Download and Install Panelica
Installation is a single command. The installer downloads everything, compiles services, sets up databases, configures SSL, and starts all 20 services automatically:
curl -sSL https://get.panelica.com/install.sh | bashOr if you prefer to inspect the script first (always a good practice):
# Download the installer
wget https://get.panelica.com/install.sh

# Review it (optional)
less install.sh

# Run it
bash install.sh
What the Installer Does (27 Automated Steps)
The installation script is not a simple package installer. It is a full provisioning system that runs approximately 27 steps:
- Detects OS version (Ubuntu 22.04 or 24.04) and architecture
- Installs system dependencies (
libssl,libcurl,libmagickwand,libgd, etc.) - Creates the
/opt/panelica/directory structure - Extracts pre-compiled binaries (Go 1.24 backend, CLI tools)
- Configures PostgreSQL 17 (panel database, port 5433)
- Configures MySQL 8 (user databases, socket-only)
- Configures Redis 7 (sessions and bandwidth, port 6479)
- Sets up Nginx (panel proxy on 8443, customer sites on 80/443)
- Sets up Apache (backend for PHP sites, ports 7080/7081)
- Configures PHP 5.6 through 8.5 with per-version PHP-FPM pools (8.x native, 5.6/7.x via Docker shim)
- Sets up BIND 9 (authoritative DNS server)
- Configures ProFTPD with cgroup-based quota isolation
- Sets up Postfix + Dovecot + OpenDKIM (email stack, disabled until configured)
- Installs and configures ModSecurity with OWASP CRS
- Configures Fail2ban with Panelica-specific jail rules
- Sets up nftables firewall rules
- Installs ClamAV antivirus daemon
- Sets up Prometheus + Node Exporter (monitoring)
- Installs phpMyAdmin and pgAdmin4 (with SSO integration)
- Installs Roundcube webmail
- Runs database migrations (200+ schema migrations)
- Seeds default configuration (features, permissions, languages)
- Generates self-signed SSL for the panel
- Configures systemd services (26 service units)
- Initializes cgroups v2 controllers
- Starts all services and verifies health
- Prints access credentials
Installation Output
During installation, you'll see progress for each step. The process takes approximately 2-5 minutes depending on your server and network speed. When it completes, you'll see something like:
============================================================
  Panelica Installation Complete
============================================================
  Panel URL:    https://YOUR_SERVER_IP:8443
  Username:     root
  Password:     [generated password shown here]

  Save these credentials! Change password after first login.
============================================================panelica user reset-password root
Step 3: Access Your Panel
Open your browser and navigate to:
https://YOUR_SERVER_IP:8443You will see a browser security warning — this is expected. The panel uses a self-signed SSL certificate by default. Click "Advanced" and proceed. Once you configure a real domain for your panel, you can issue a Let's Encrypt certificate to eliminate this warning.
Log in with the credentials shown at the end of installation. The dashboard shows your server's real-time resource usage: CPU, RAM, disk I/O, network bandwidth, and the status of all 20 services.
First Login Checklist
- Change your password — Profile → Security → Change Password
- Enable two-factor authentication — Profile → Security → 2FA (TOTP)
- Set your panel hostname — Settings → Panel Settings → Hostname
- Review firewall rules — Security → Firewall (default rules are already in place)
- Check service status — Dashboard → all 20 services should show green
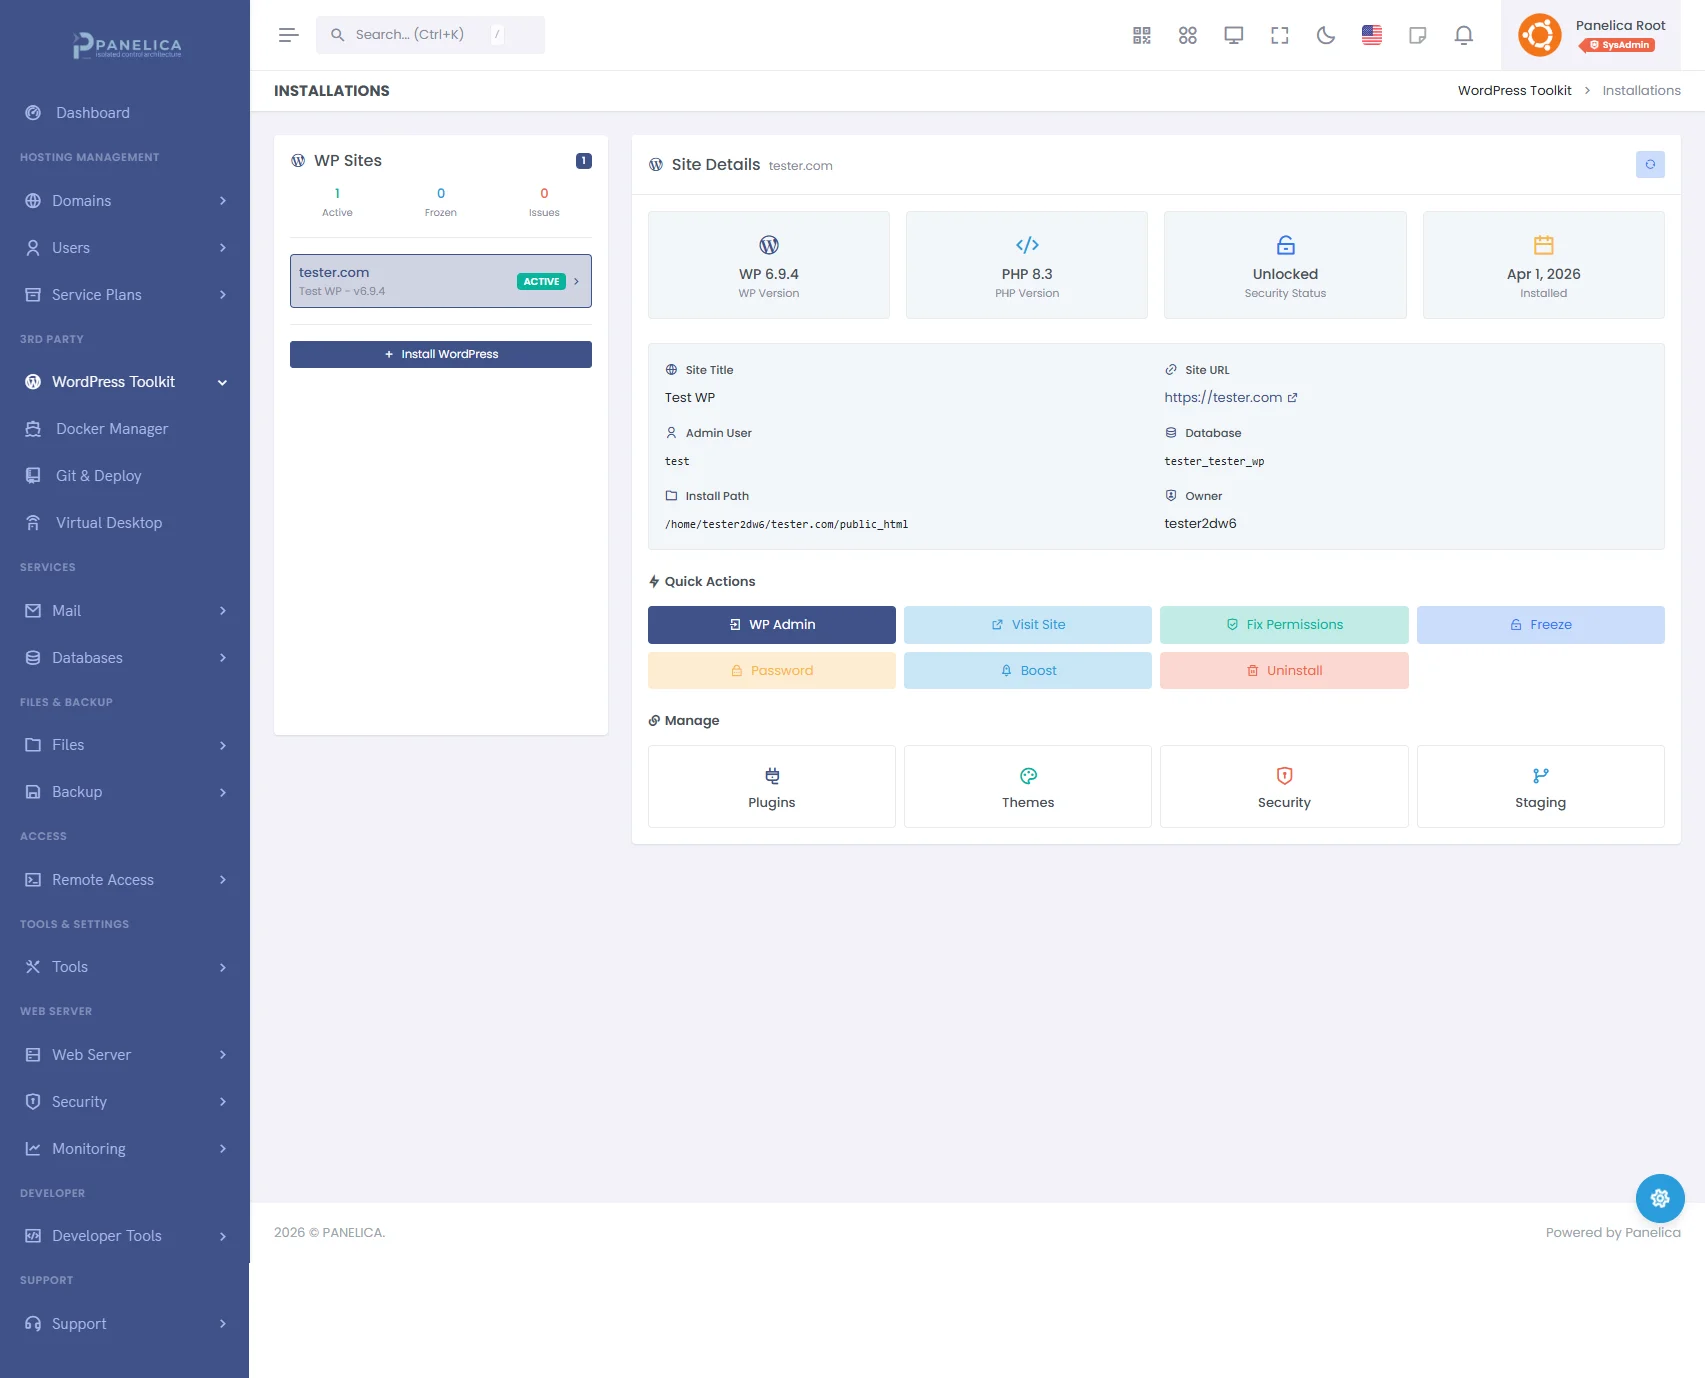
Panelica WordPress Toolkit — Complete WordPress management from your panel
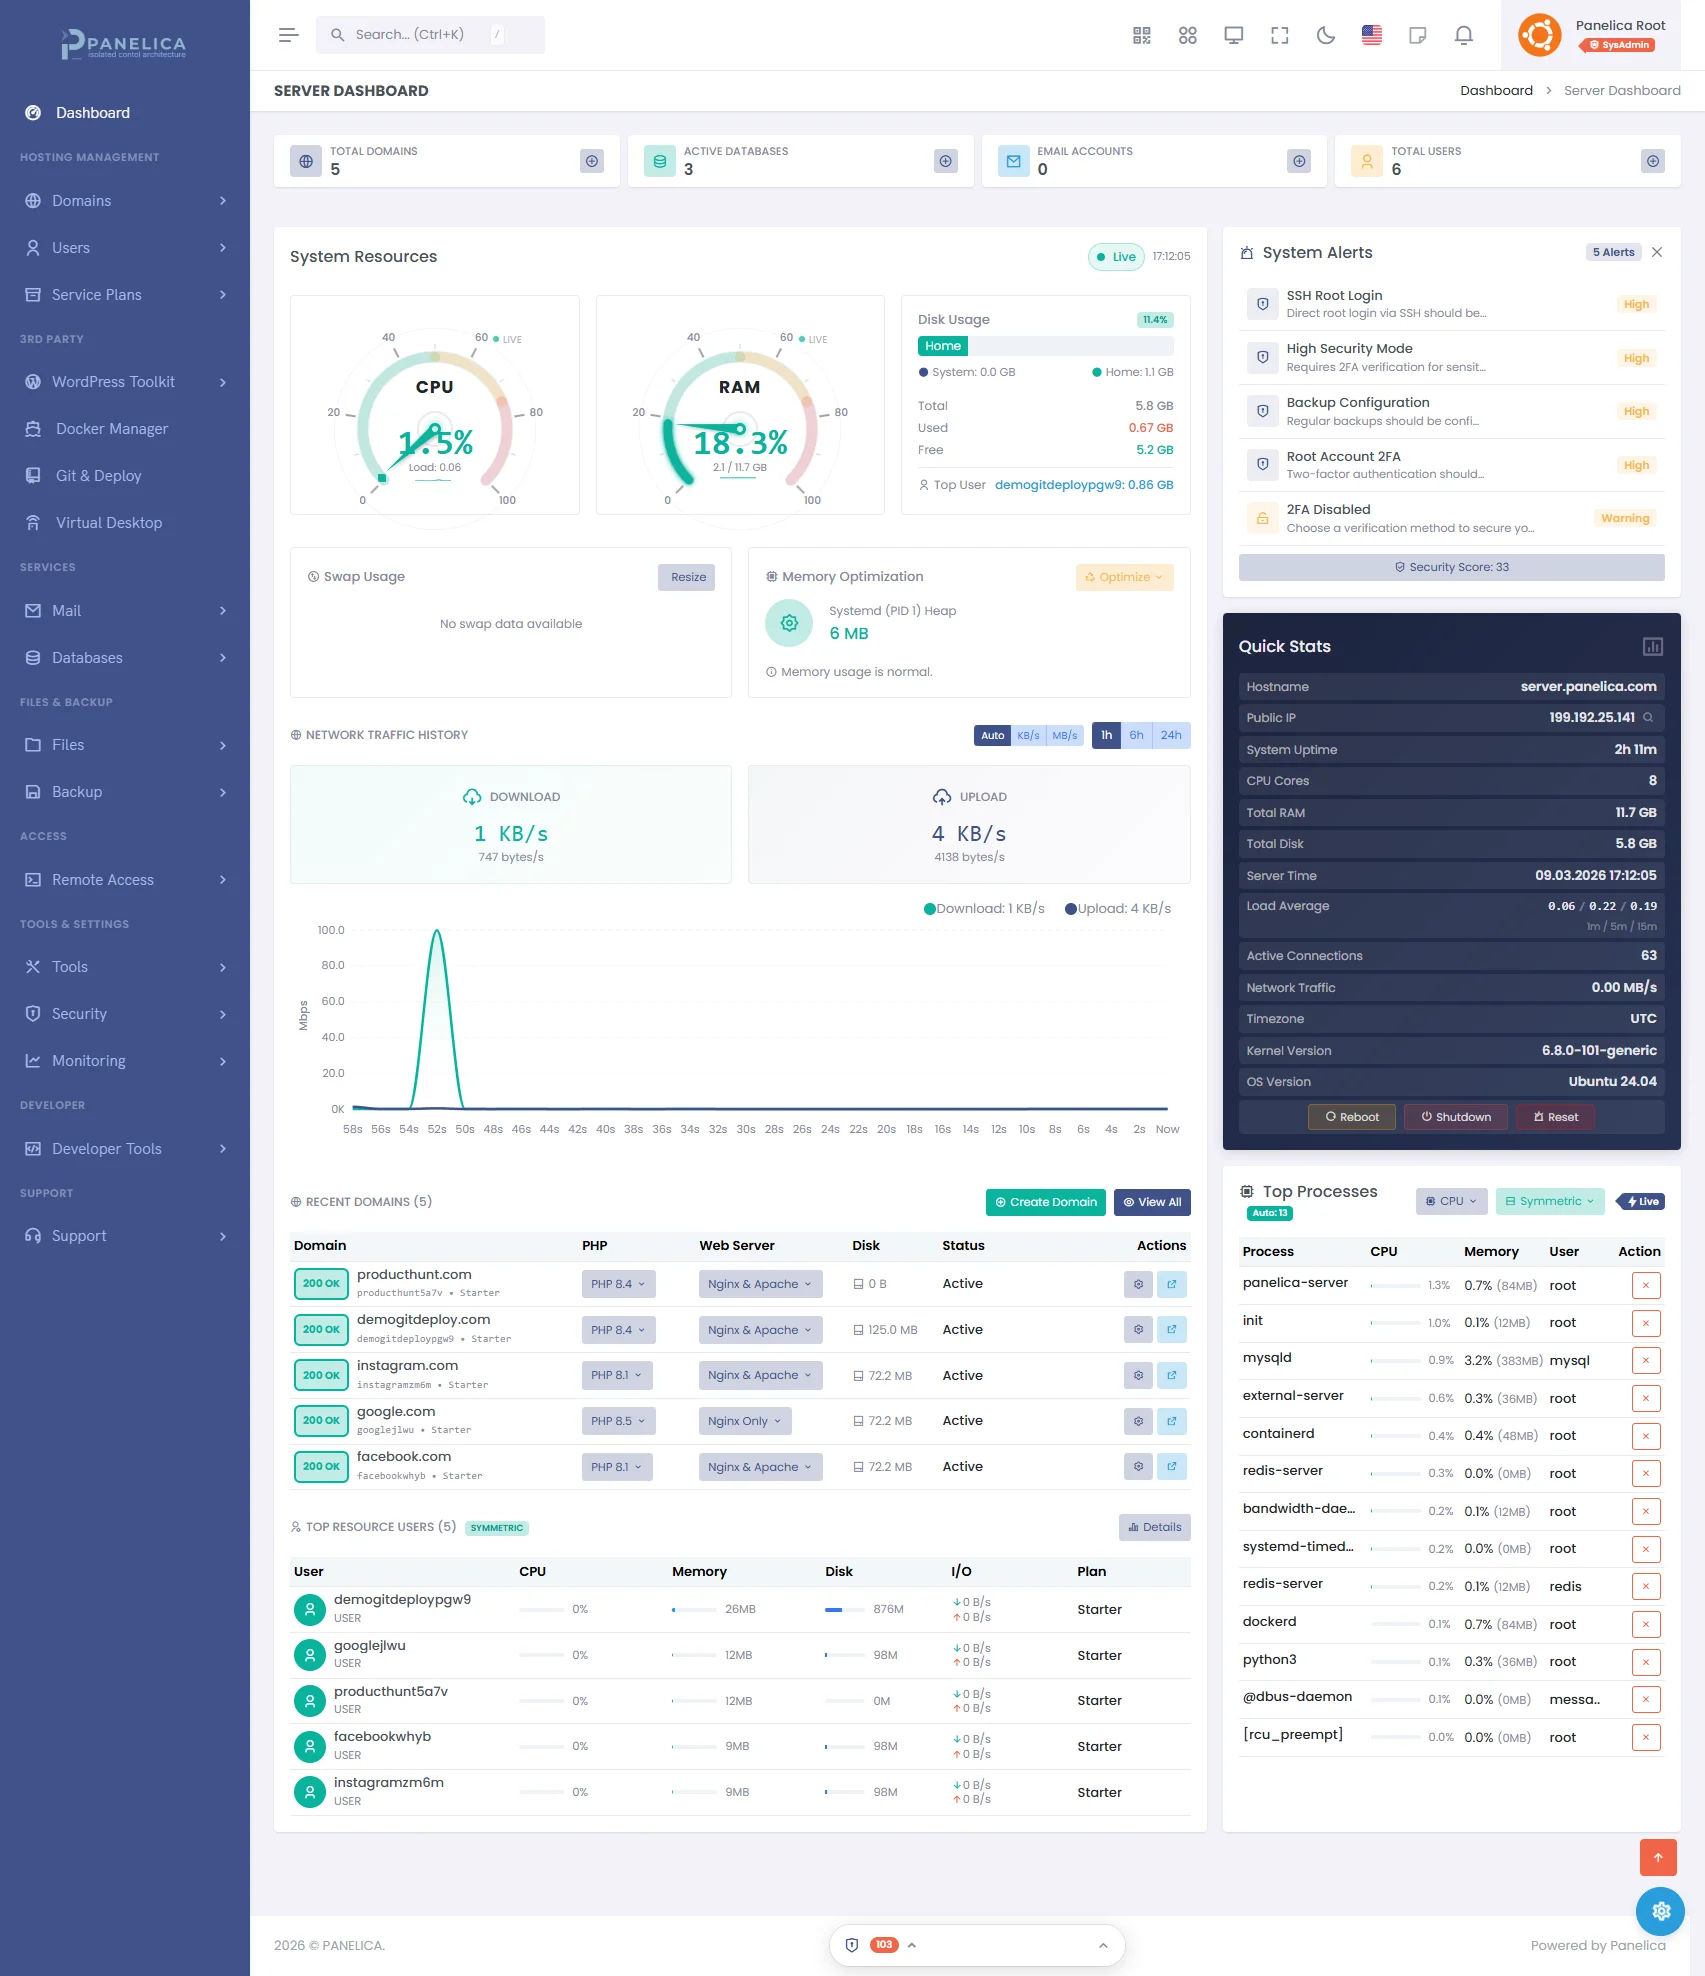
Panelica Dashboard — Modern server management at a glance
What Gets Installed: Architecture Overview
Everything Panelica installs lives under /opt/panelica/. Nothing touches system directories like /etc/nginx/, /etc/mysql/, or /var/www/html/. This means:
- No conflicts with existing system packages
- No surprises when running
apt upgrade - Complete server can be moved by rsync-ing a single directory
- Each service version is pinned and controlled
The Full Stack
Nginx (reverse proxy, 80/443 + panel 8443)
Apache (PHP backend, 7080/7081)
Automatic vhost generation for every domain
Versions 8.1, 8.2, 8.3, 8.4 (all active)
Per-user, per-version PHP-FPM pools
Cgroups v2 resource limits per pool
open_basedir isolation per user
PostgreSQL 17 (panel internals, port 5433)
MySQL 8 (user databases, socket)
phpMyAdmin + pgAdmin4 with SSO auto-login
Redis 7 (port 6479, Unix socket)
Used for panel sessions, bandwidth tracking, object cache
Postfix + Dovecot + OpenDKIM
DKIM/SPF/DMARC auto-configuration
ClamAV scanning, Roundcube webmail
BIND 9 authoritative DNS
Cloudflare deep integration (multi-account)
Zone auto-generation per domain
ModSecurity + OWASP CRS (WAF)
Fail2ban (SSH, FTP, HTTP brute-force)
nftables firewall
AppArmor profiles
ClamAV malware scanner
Prometheus + Node Exporter
Real-time per-user resource tracking
Bandwidth accounting
Process monitoring
5-Layer Security Isolation
Every user on Panelica gets five layers of isolation — not as a premium add-on, but as the default for every account:
- Cgroups v2 — CPU, memory, I/O, and process count limits enforced at the kernel level. One runaway PHP script cannot bring down your entire server.
- Linux Namespaces — PID and mount namespace isolation. Users cannot see each other's processes.
- SSH Chroot Jails — SFTP-only or bash+chroot. Users are confined to their home directory.
- PHP-FPM Isolation — Per-user, per-version pools with
open_basediranddisable_functionsenforcement. - Unix Permissions — Dedicated UID/GID per user, home directory set to 700, strict file ownership.
Post-Installation: The First 10 Things to Do
1. Add Your First Domain
Navigate to Domains → Add Domain. Enter your domain name, select your preferred PHP version, and Panelica handles the rest: Nginx vhost, Apache vhost, PHP-FPM pool, DNS zone, directory structure, and cgroup slice — all created automatically in a 9-step provisioning pipeline.
2. Install a Free SSL Certificate
Go to SSL → Issue Certificate. Select your domain, choose Let's Encrypt, and click Issue. The certificate is issued, installed, and configured for auto-renewal within seconds. Force HTTPS redirect is a single toggle.
3. Set Up Email
Navigate to Email → Email Accounts → Create Account. Enter the address and password. Panelica automatically creates the Postfix and Dovecot configuration, generates DKIM keys, and optionally syncs SPF/DKIM/DMARC records to Cloudflare if you've connected your account.
4. Install WordPress
Go to WordPress → Install**. Select your domain, configure the site title and admin credentials, and click Install. Panelica uses its own WordPress Toolkit — not wp-cli wrappers. It handles:
- One-click installation with automatic database creation
- Plugin and theme management from the panel
- Automatic core, plugin, and theme updates
- Staging environment creation with one click
- Redis object cache integration
- Security hardening (wp-config protection, XML-RPC blocking, file permission enforcement)
5. Configure Automated Backups
Navigate to Backup → Scheduled Backups. Set a daily or weekly schedule. Panelica supports:
- Full server backups or per-domain backups
- Incremental backups (BTRFS snapshots)
- Remote destinations: S3, Google Drive, SFTP, OneDrive
- Retention policies
- One-click restore
6. Enable ModSecurity WAF
Go to Security → ModSecurity. Enable it globally or per-domain. Panelica ships with the OWASP Core Rule Set pre-configured. You can add custom rules, set detection-only mode, or enable active blocking with a single toggle.
7. Set Up IP and Country Blocking
Under Security → IP Blocking and Security → Country Blocking, you can block individual IPs, ranges, or entire countries from accessing your server. Rules are enforced at the nftables level — blocked requests never reach your application.
8. Create User Accounts
If you are hosting sites for multiple clients, go to Users → Add User. Each user gets full isolation (the 5-layer system described above), their own resource limits, and access to only their own domains and databases. The RBAC system has four levels: ROOT, ADMIN, RESELLER, and USER.
9. Connect Cloudflare
Navigate to Cloudflare → Add Account**. Enter your API token. Panelica's Cloudflare integration allows you to manage DNS records, firewall rules, page rules, caching settings, and analytics directly from the panel — no need to log into Cloudflare separately for day-to-day tasks.
10. Explore the Developer Tools
Panelica includes a full API (246 endpoints), webhook support (HTTP, Telegram, Slack, Discord), API key management with granular scopes, a web-based terminal, file manager with code editor, Git manager, and Docker container management. Navigate to Developer Tools to explore.
Adding Your First Website: Step by Step
Here is a complete walkthrough for adding a domain and deploying a website:
Step 1: Point DNS to Your Server
At your domain registrar (or Cloudflare), create an A record pointing your domain to your server's IP address:
Type: A
Name: @  (or your-domain.com)
Value: YOUR_SERVER_IP
TTL: 300 (5 minutes, for faster propagation)

# Also add www subdomain
Type: A
Name: www
Value: YOUR_SERVER_IP
TTL: 300
Step 2: Add the Domain in Panelica
In the panel, navigate to Domains → Add Domain:
- Enter your domain name (e.g.,
example.com) - Select PHP version (8.4 recommended for new projects)
- Choose document root (default:
/home/username/public_html/example.com) - Click Create Domain
Panelica immediately provisions: an Nginx vhost, an Apache vhost (for PHP), a PHP-FPM pool for that user, a BIND DNS zone, the directory structure, and a cgroup slice for resource tracking. This takes about 3-5 seconds.
Step 3: Issue an SSL Certificate
- Navigate to SSL Management
- Find your domain and click Issue Certificate
- Select Let's Encrypt
- Enable Force HTTPS
- Click Issue
Let's Encrypt issues certificates via the ACME protocol. Panelica handles the HTTP-01 challenge automatically. The certificate is valid for 90 days and renews automatically.
Step 4: Upload Your Files
You have three options:
- Web File Manager — Navigate to Files → File Manager. Upload files, edit code with the built-in CodeMirror editor, set permissions, create archives.
- SFTP — Connect with any SFTP client (FileZilla, Cyberduck, etc.) using your Panelica credentials on port 22.
- Git — Navigate to Git Manager, add your repository, and deploy directly from GitHub, GitLab, or any Git remote.
WordPress One-Click Installation
Panelica's WordPress Toolkit is purpose-built, not a wrapper around WP-CLI. Here's how to use it:
- Navigate to WordPress → Install WordPress
- Select the domain
- Enter site title, admin username, admin password, and admin email
- Choose install path (
/for root, or a subdirectory) - Click Install
Panelica creates the database, runs the WordPress installer, configures wp-config.php with correct database credentials and security keys, and sets proper file permissions — all automatically.
WordPress Security Hardening
After installation, you'll see security hardening options in the WordPress Toolkit:
- Protect wp-config.php — blocks direct HTTP access
- Disable XML-RPC — prevents brute-force and DDoS amplification
- Block PHP execution in uploads — prevents webshell uploads from executing
- Force strong admin passwords
- Enable WordPress security keys rotation
Upgrading Panelica
Updates are managed through the panel itself. When a new version is available, you'll see a notification in the dashboard. Navigate to System → System Updates.
The update system:
- Downloads and verifies the update package
- Creates an automatic backup before applying
- Updates binaries, frontend, configurations, and database migrations
- Performs a zero-downtime restart for most components
- Supports rollback if the update fails verification
You can also update individual components (just the backend binary, just the frontend, or a specific service like PHP) without updating the entire panel.
Troubleshooting Common Issues
Cannot Access Panel on Port 8443
If you can't reach https://your-ip:8443:
# Check if the panel service is running
/opt/panelica/bin/pn-service status all

# Check if port 8443 is listening
ss -tlnp | grep 8443

# Check firewall — allow if needed
ufw allow 8443/tcp
If you're using a cloud provider (AWS, DigitalOcean, Hetzner, etc.), also check the security group or network firewall in their dashboard — those are separate from the OS-level firewall.
SSL Warning in Browser
This is expected on first access. Panelica uses a self-signed certificate for the panel by default. Click "Advanced" → "Proceed" in your browser. To get a trusted certificate for the panel, assign a domain to your server and issue a Let's Encrypt certificate for it in SSL Management.
MySQL Connection Issues
Panelica's MySQL runs on a Unix socket, not a TCP port. Direct mysql -h localhost will fail unless you specify the socket:
mysql -u root -p --socket=/opt/panelica/var/run/mysqld.sockUse the panel's database manager (Databases → MySQL) for day-to-day database operations. For external connections, use the remote access management feature to create a TCP-accessible database user.
Email Not Sending
If outbound email is not working, check:
- PTR record — your server IP must have a reverse DNS (PTR) record matching your hostname. Set this in your VPS provider's dashboard.
- DKIM setup — navigate to Email → Authentication to verify DKIM is configured and DNS records are published.
- Port 25 — many cloud providers block outbound port 25 by default. Check with your provider. Port 587 (submission) is usually unblocked.
Slow Site Performance
If a website feels slow, check:
- PHP-FPM pool settings — navigate to Domains → [your domain] → PHP Settings to tune process manager, max children, and request limits.
- Cgroup resource limits — check if the user has CPU or memory limits that are being hit (Users → [user] → Resource Usage).
- Enable Redis object cache for WordPress — WordPress → [site] → Performance → Enable Object Cache.
Frequently Asked Questions
Is Panelica really free to use?
Panelica has a free Starter plan (1 domain, forever) with a 14-day premium preview at signup. Paid plans start at $4.99/month (Professional: 50 domains, 5 users), $9.99/month (Business: 100 domains, 25 users, Docker), and $24.99/month (Enterprise: unlimited). Annual billing saves 25%. There is a 30-day money-back guarantee.
Ubuntu 22.04 vs 24.04 — which should I use?
Both are fully supported. Ubuntu 24.04 LTS (Noble Numbat) is the newer release and the recommended choice for new installations. Ubuntu 22.04 LTS (Jammy Jellyfish) is equally stable and supported. Both receive security updates until 2027 (22.04) and 2029 (24.04).
Can I run Docker containers alongside Panelica?
Yes. Panelica includes a native Docker manager: container management, image management, Docker Compose support, app templates (with subdomain routing pre-configured), and per-container cgroup resource limits. Navigate to Docker in the panel.
How do I migrate from cPanel or Plesk?
Panelica has a built-in universal migration tool that imports from cPanel, Plesk, DirectAdmin, CyberPanel, and HestiaCP. It transfers domains, files, databases, email accounts, DNS zones, and SSL certificates. MySQL password hashes are transferred directly, so users don't need to reset their database passwords. Navigate to Migration in the panel.
Can I host multiple websites for different clients?
Yes. Create a RESELLER or USER account for each client. Each user gets their own isolated environment, resource limits, and access only to their own domains and databases. You can set resource quotas per user (CPU, RAM, disk, domains, email accounts, databases, FTP accounts).
What happens to my sites if Panelica stops running?
Nginx and Apache run as independent system services. If the Panelica backend (management API) stops, your websites continue to serve traffic. The panel itself going down only affects management operations, not site availability.
Can I use Panelica with Cloudflare?
Yes, and the integration goes deep. Beyond basic DNS management, Panelica's Cloudflare module supports: zone management, firewall rules, page rules, cache control, analytics, and automatic mail DNS (SPF, DKIM, DMARC) synchronization when you create email accounts. Multiple Cloudflare accounts are supported.
Next Steps
Once you're up and running, here's what to explore next:
- Security hardening — Run the built-in Security Advisor, which performs 50+ checks and gives actionable recommendations for locking down your server.
- Monitoring — The Prometheus + Grafana integration (optional setup) gives you detailed historical metrics for every service.
- API & webhooks — Panelica's External API (246 endpoints, HMAC-SHA256 authentication) lets you automate server management from your own applications. Webhooks can post notifications to Slack, Discord, Telegram, or any HTTP endpoint.
- Mobile app — The Panelica mobile app lets you monitor resource usage, manage domains and backups, and control services from your phone.
Panelica is built by people who manage real servers, host real websites, and deal with real problems. Every feature in this guide exists because we needed it ourselves. If you run into something that doesn't work the way it should, the Panelica community forum is the place to report it or ask for help.
Your server. Your control. No surprises at 3 AM.
Thinking about switching from cPanel?
See how Panelica compares feature-by-feature, including real 2026 pricing and migration steps.
See the full comparison