Panelica lets one panel manage every other Panelica server you run: you add a server by pasting a one-time code, and from then on its live resources, its domains and mailboxes, and its full panel are one click away in the same browser window. No database replication, no SSH keys between machines, no second login. Every server stays a complete, independent installation, so a master that goes offline never takes a website with it.
One list for the whole fleet
The first thing you see on the master is the server list. Fourteen servers in nine countries, on Ubuntu, Debian, AlmaLinux and Rocky Linux, from a 4-core storage box to a 48-core dedicated machine, all in one table: status, Panelica version, CPU, RAM, disk and network, account count and the time of the last answer. While the page is open, every server is refreshed every 10 seconds in a single call, and a slow server never holds up the rest.
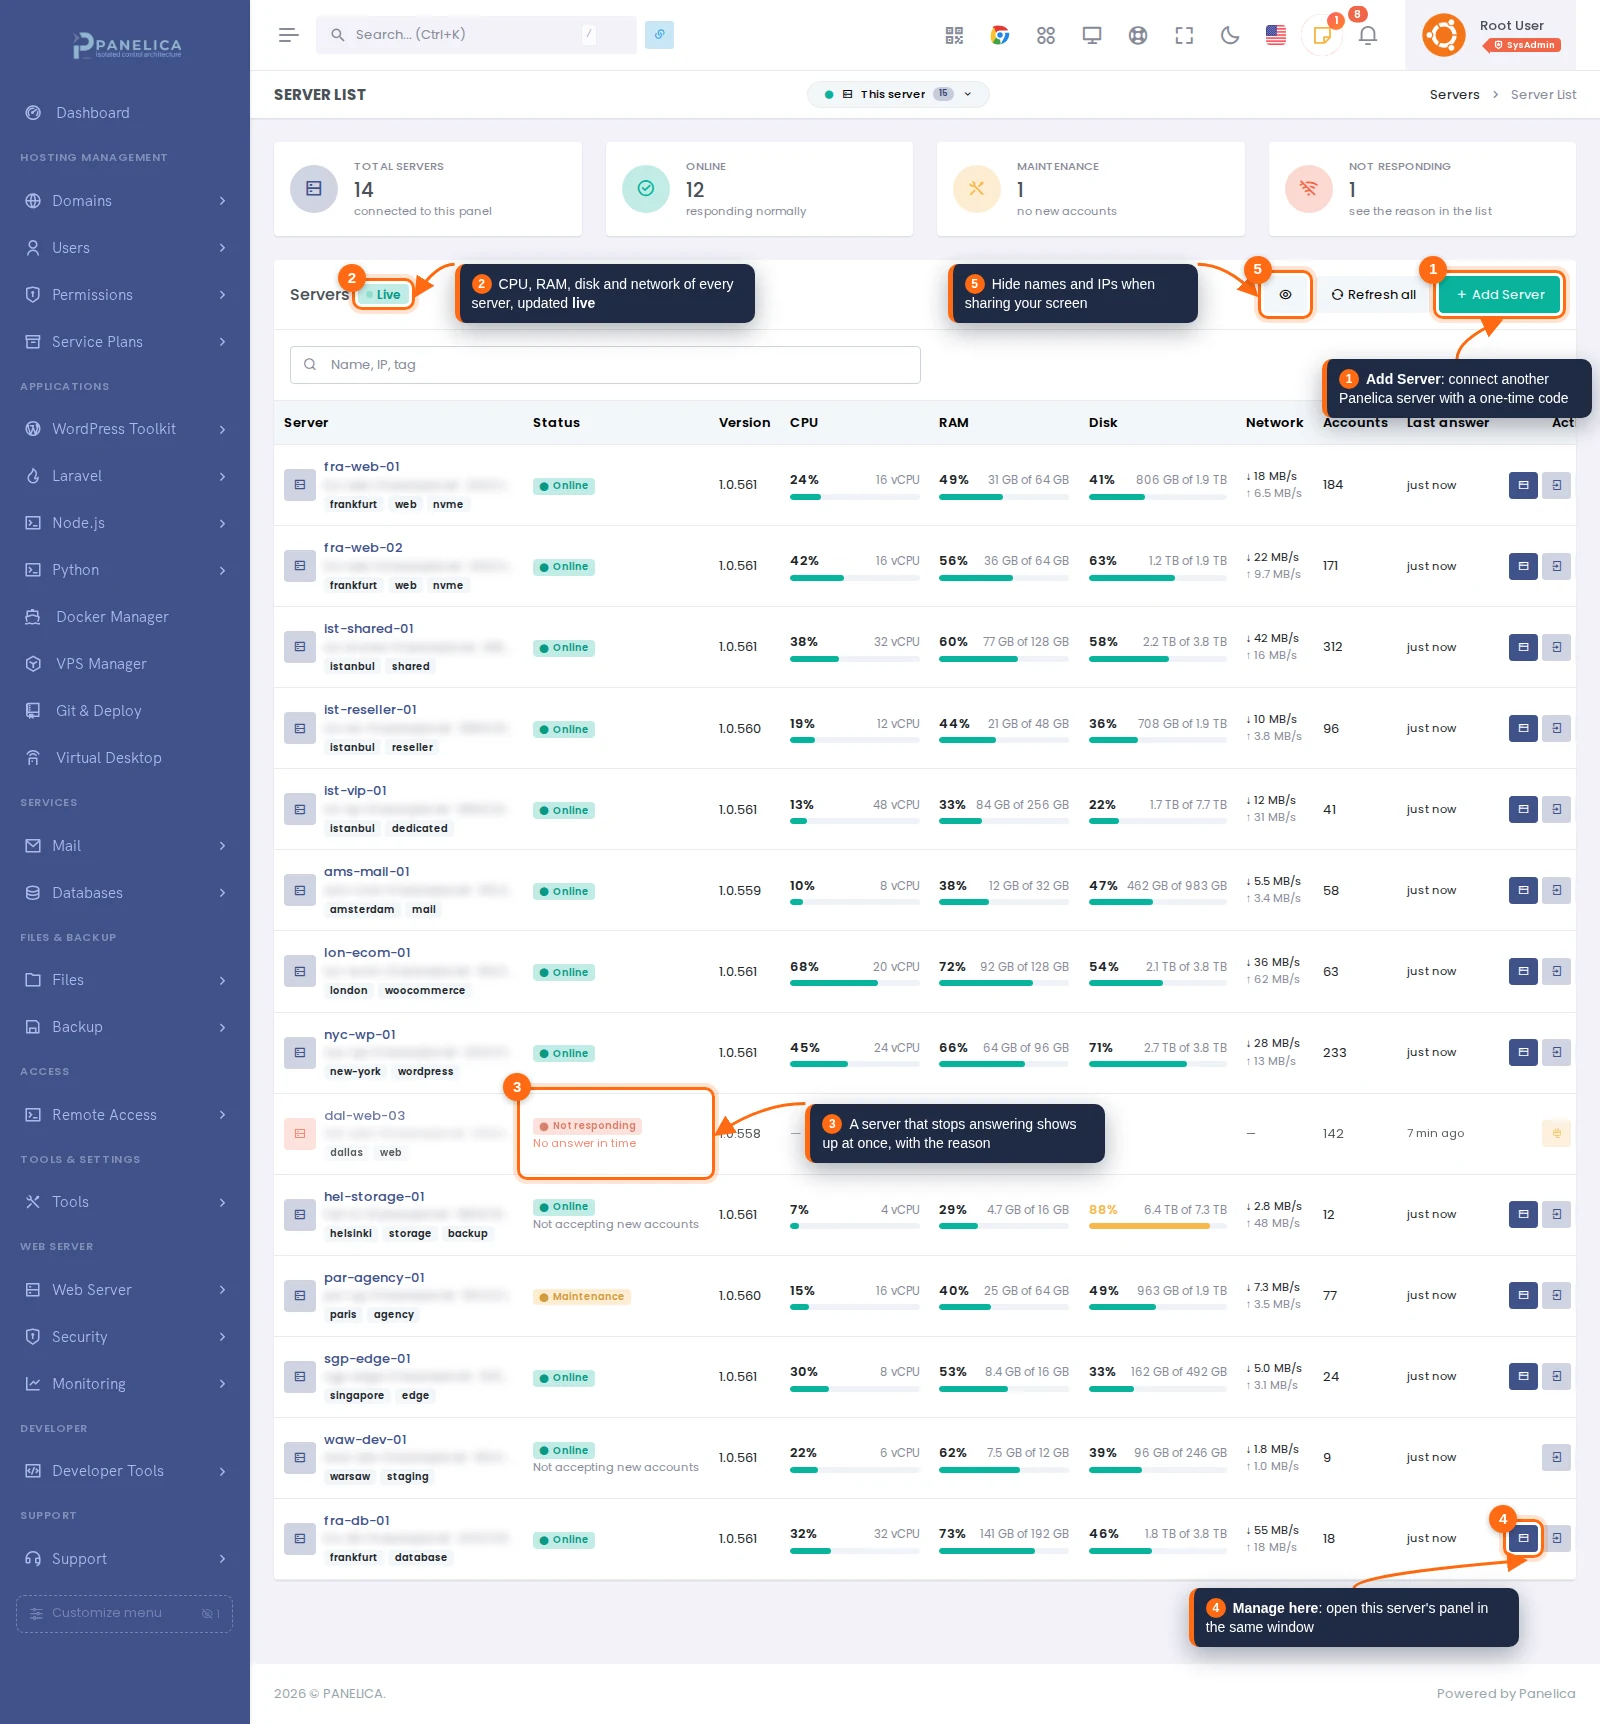
The master's server list. Host names and IP addresses are blurred in all screenshots.
The four cards at the top answer the morning question before you scroll: how many servers, how many online, how many in maintenance, how many not answering. A server that stops responding is marked in its row with the reason, such as "No answer in time" or a refused connection, instead of a generic red light.
When you share your screen or record a video for a customer, the eye button hides every host name and IP address and shortens server names to their first and last character.
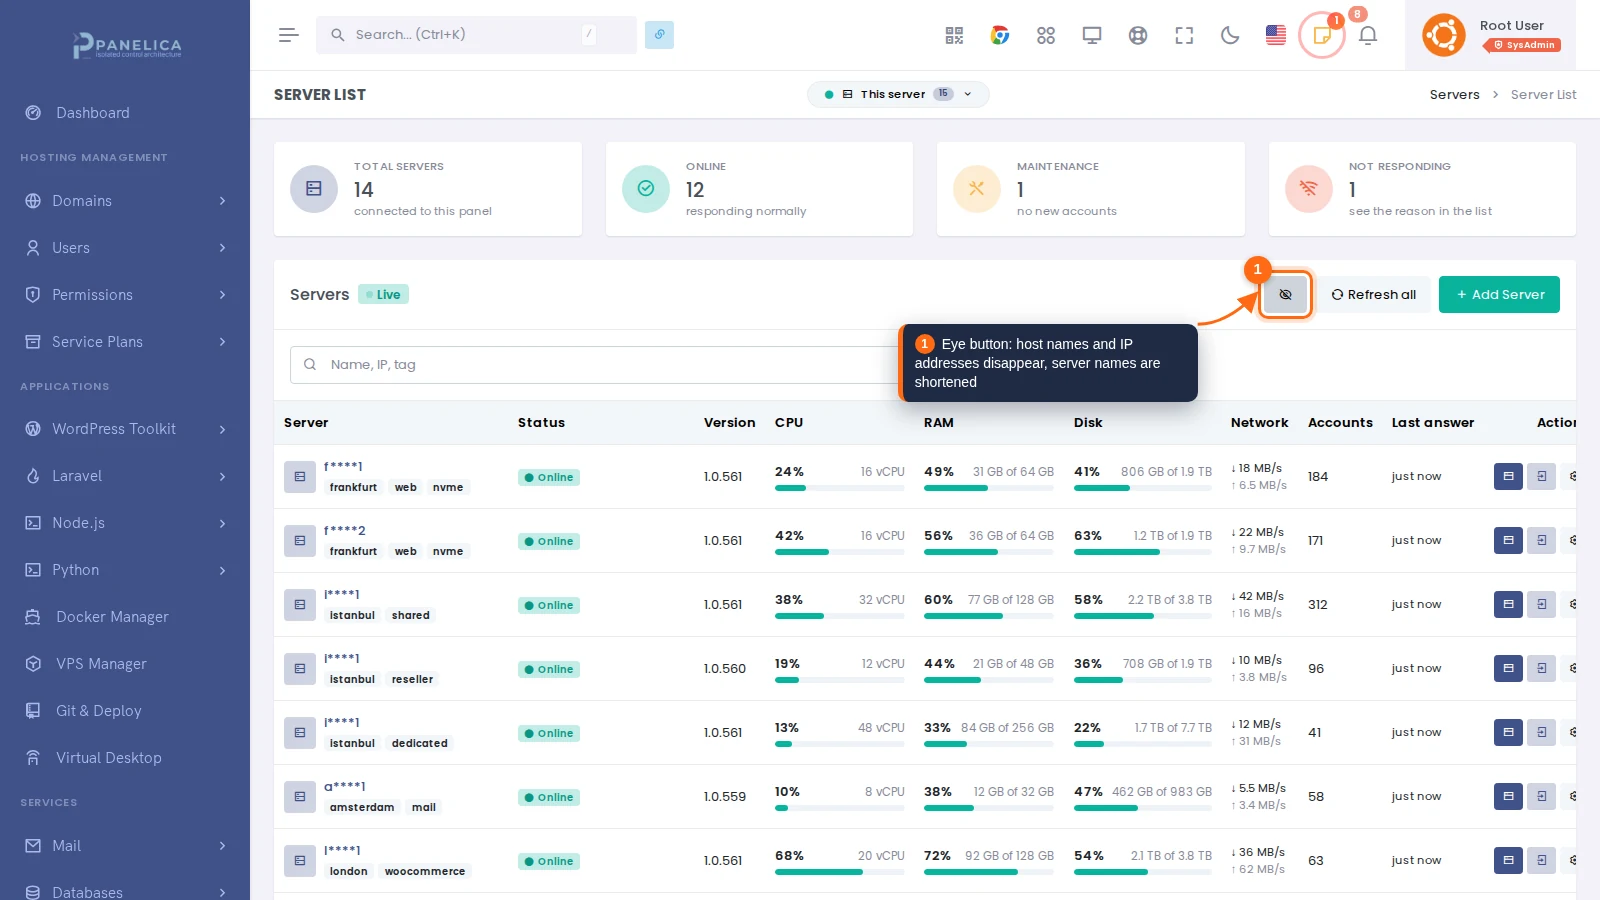
One click hides names and addresses for screen sharing.
Step 1: create a link code on the server you want to add
Trust starts on the server being added, because that server decides who may manage it. Open Panel Settings › Master Connection, optionally give the master a label, and click Create Link Code. The same code can be created on the command line with panelica node link-code.
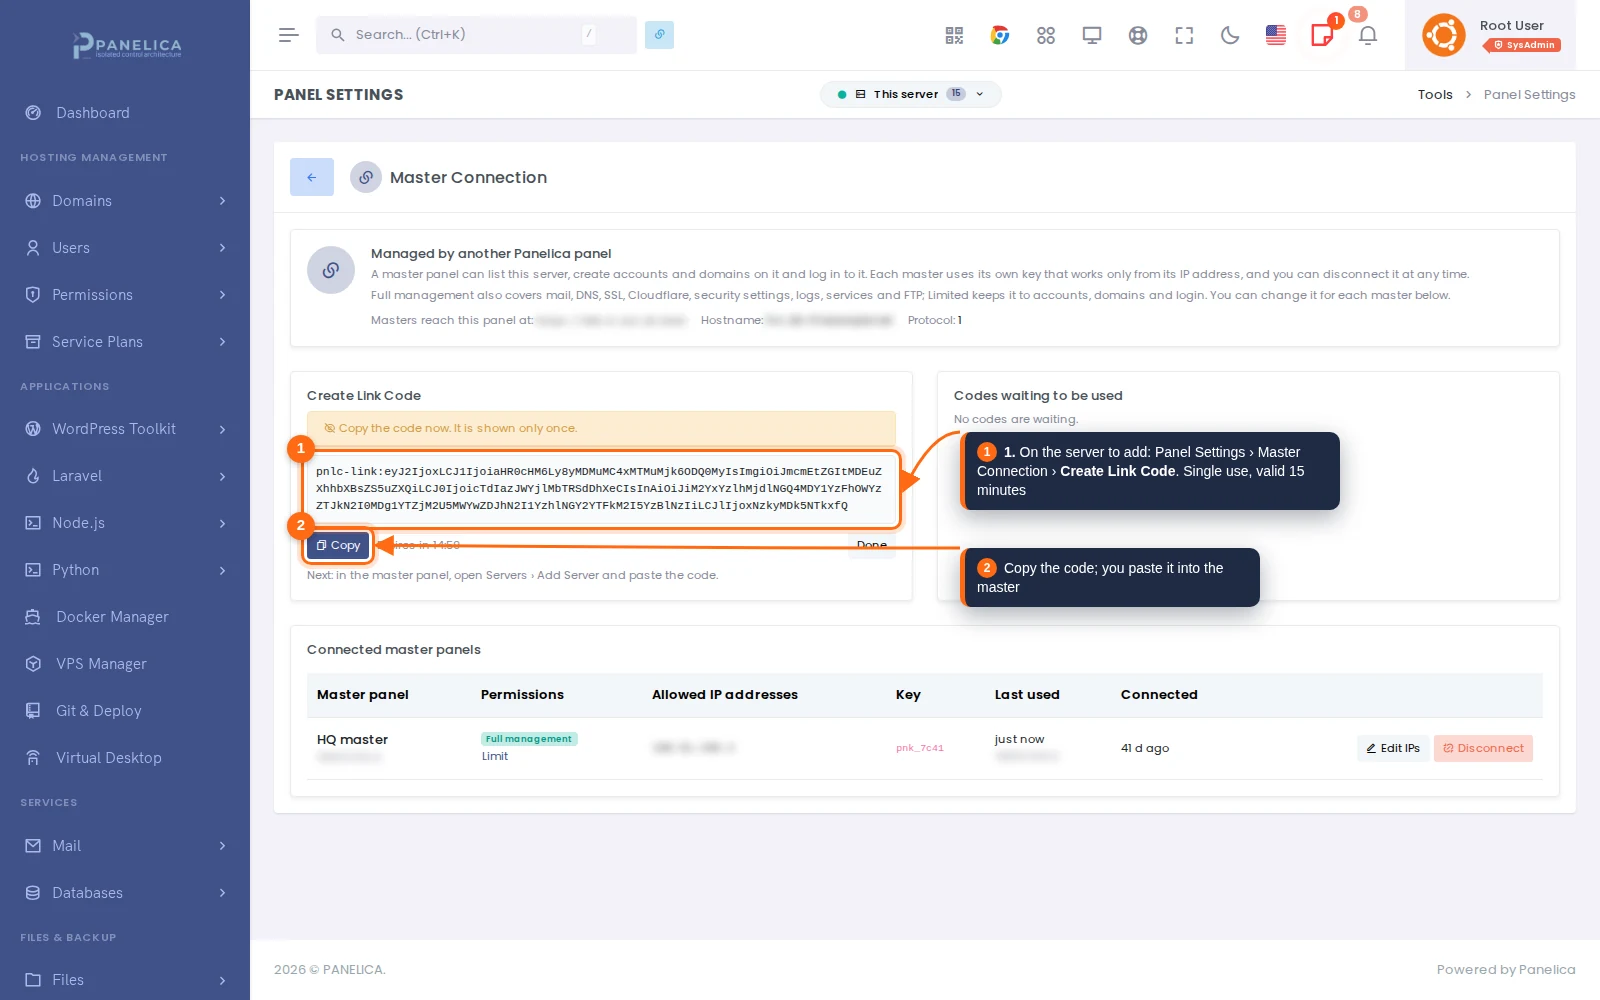
The code is shown once, works once and expires after 15 minutes.
The code carries the server's panel address, host name and certificate key, so the master knows exactly which machine and which certificate to expect. There is nothing else to copy: no API key, no secret, no password.
Step 2: paste it into the master
On the master, open Servers › Add Server and paste the code. The address, host name, certificate key and the remaining validity appear under the field the moment the code is pasted. Give the server a name and tags, choose whether new accounts may be placed on it, and click Connect.
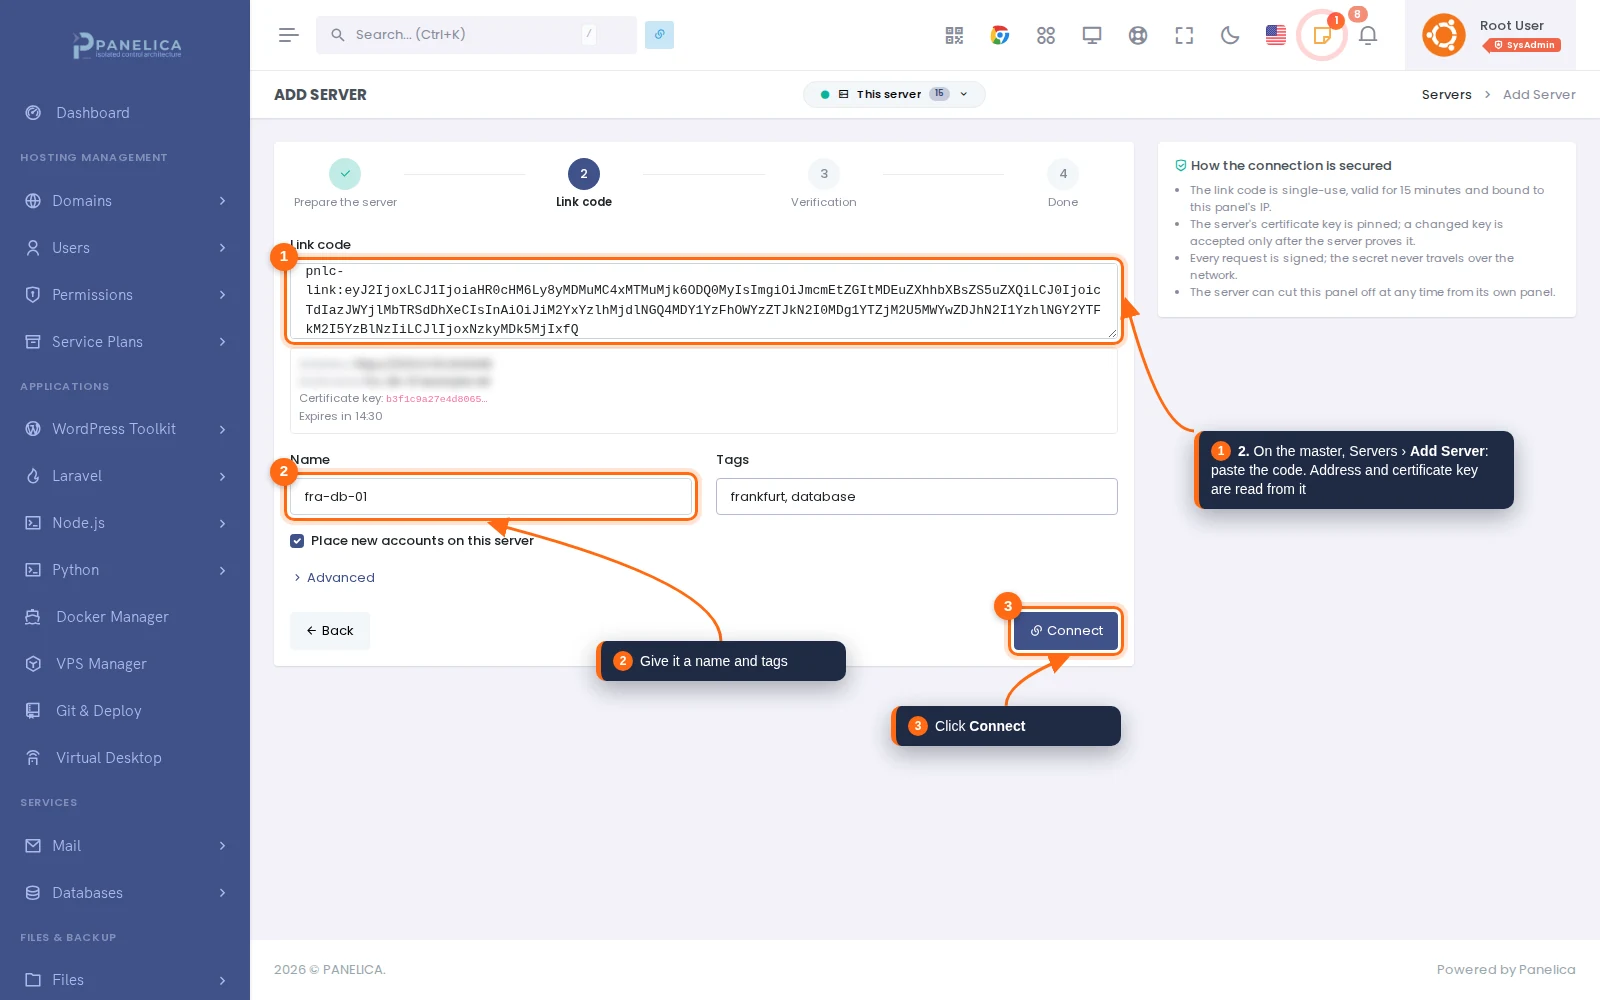
Servers › Add Server on the master. A server behind NAT gets its real address under Advanced.
Step 3: the master verifies before it trusts
Nothing is saved until every check passes:
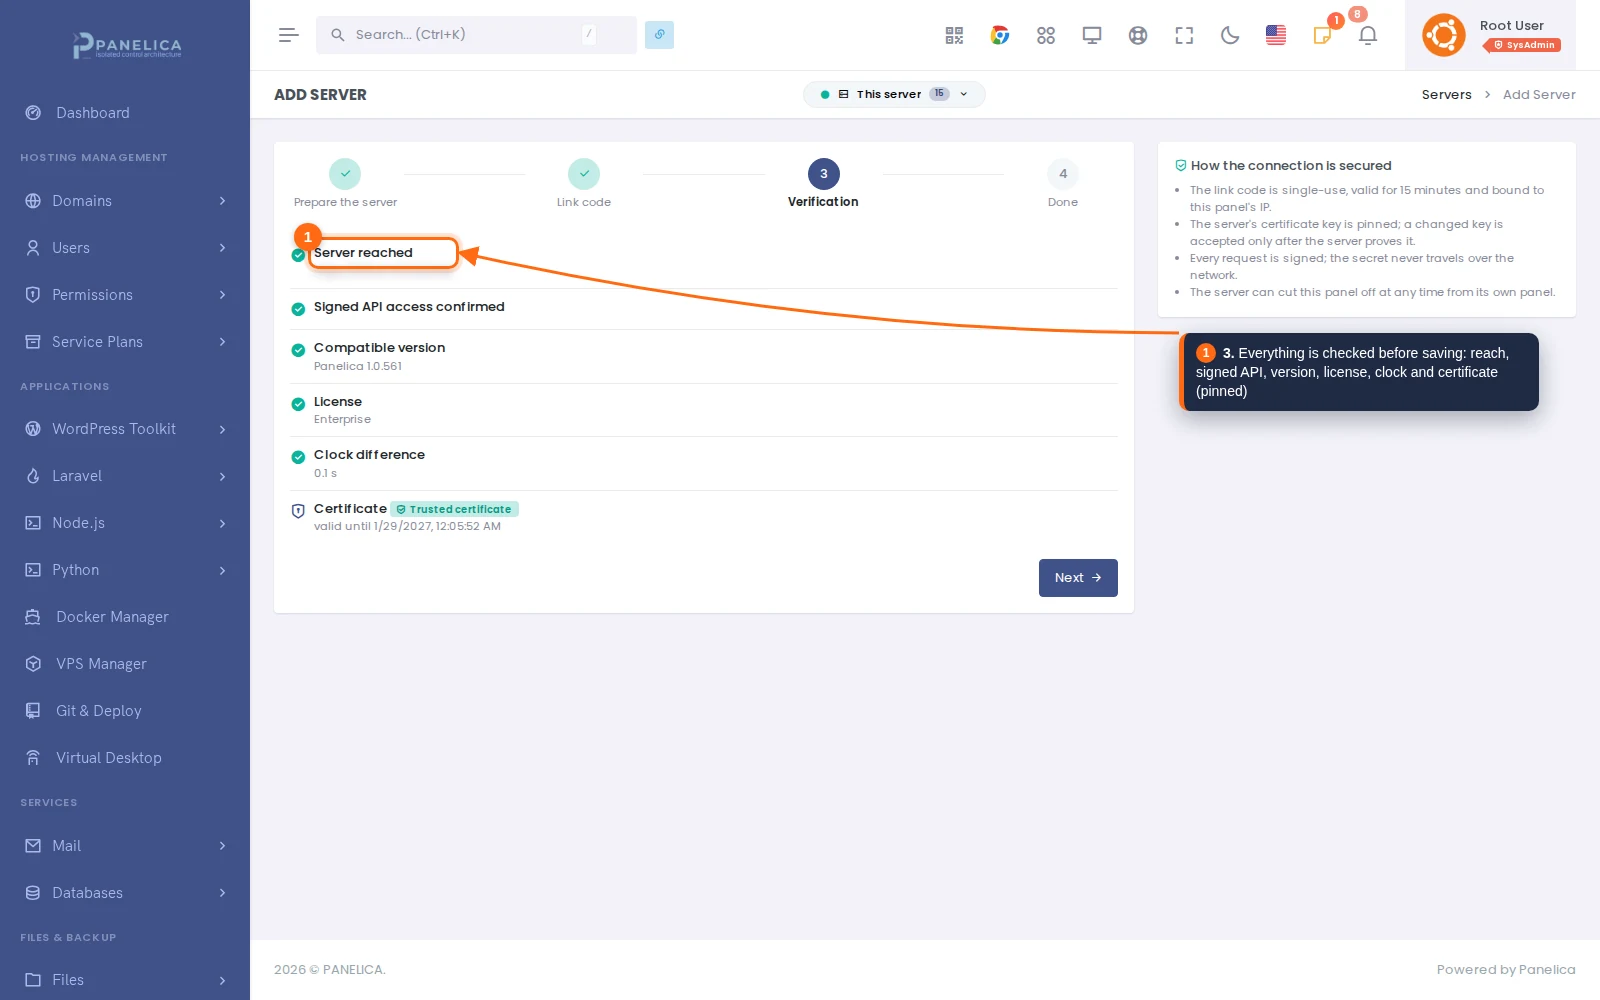
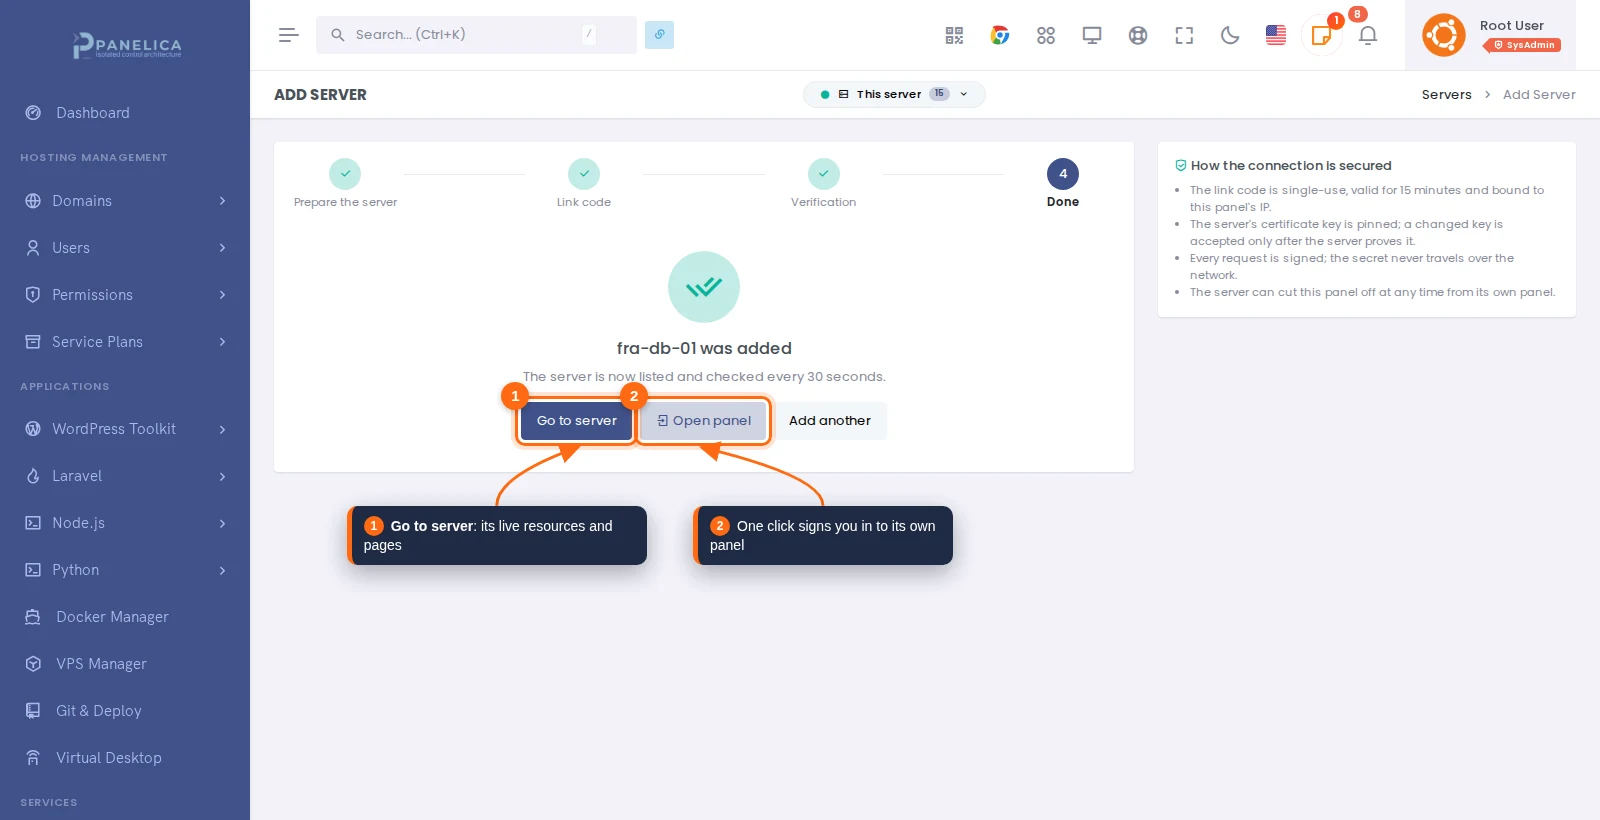
The last step confirms the server was added. From here it is listed and checked every 30 seconds; Go to server opens its page and Open panel signs you in to its own panel in a new tab, without typing a password.
A server's page: live resources and every tool one click away
Each server has its own page on the master. Live CPU, RAM, disk and network refresh every 5 seconds with a short history graph. Below them sit the same shortcuts as the dashboard: domains, mail, DNS, SSL, Cloudflare, firewall, Fail2ban, ModSecurity, antivirus, the Security Advisor, terminal, SSH, files, services, logs and updates. Each one opens that page of that server.
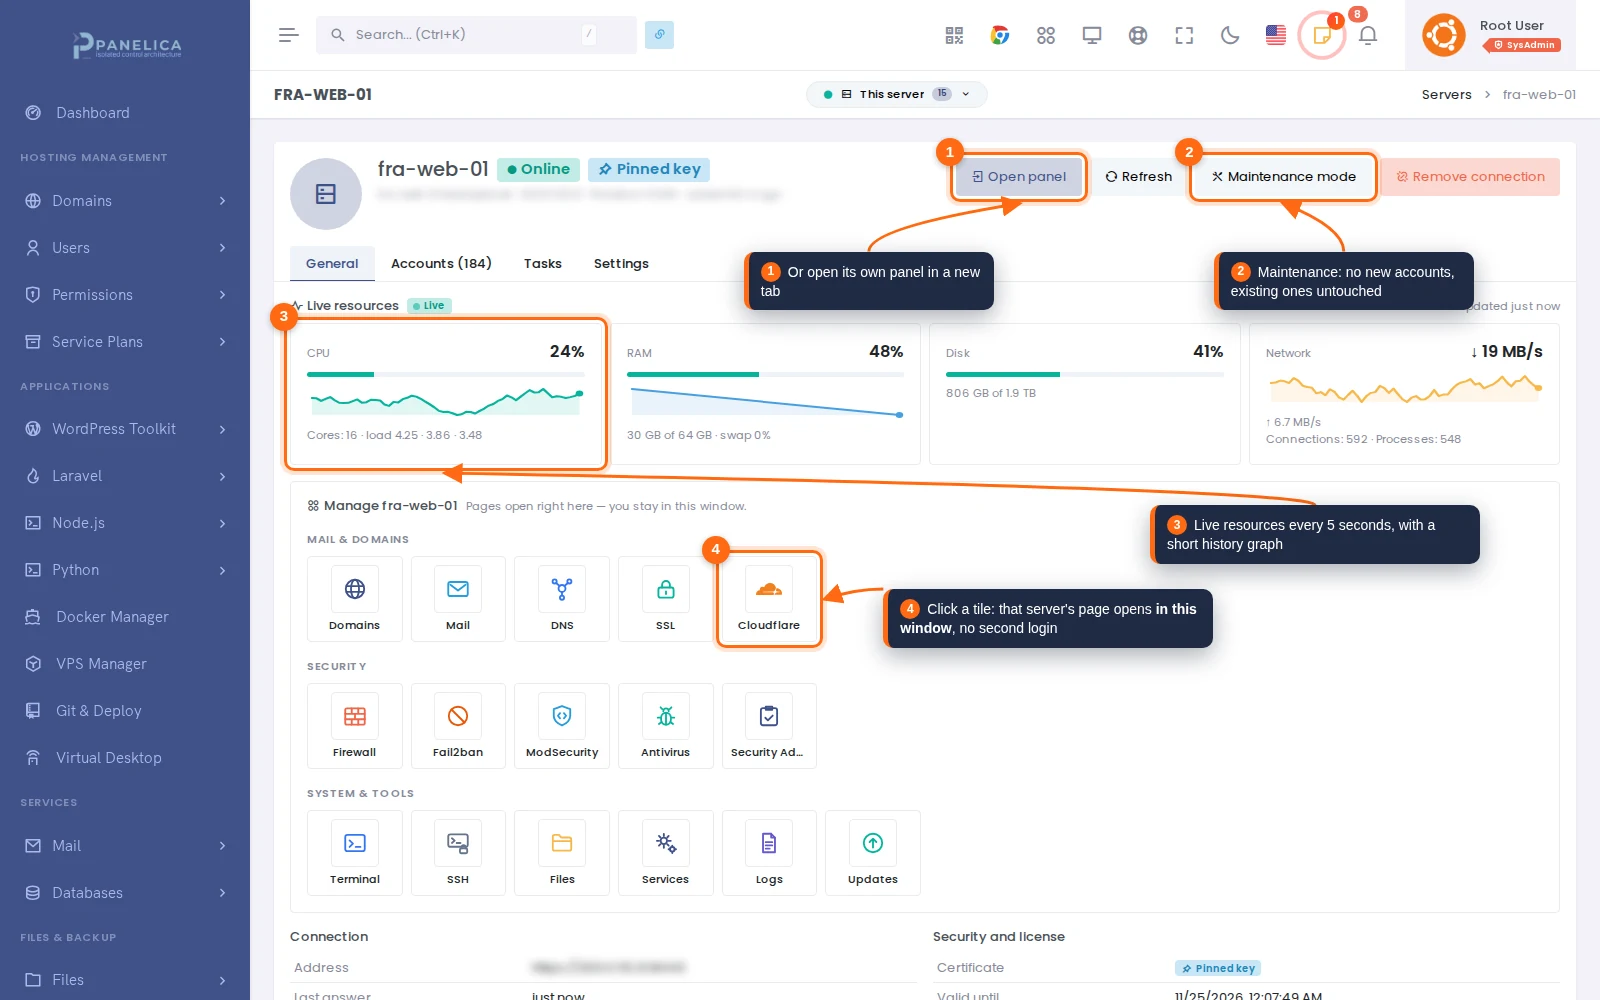
One server's page on the master. Maintenance mode stops new accounts without touching existing ones.
Switch the whole panel to another server
This is the part that changes daily work. Every page has a server switcher in its title row. Pick a server, and the panel you are looking at becomes that server's panel: same pages, same layout, same muscle memory, but every action now runs on the server you picked.
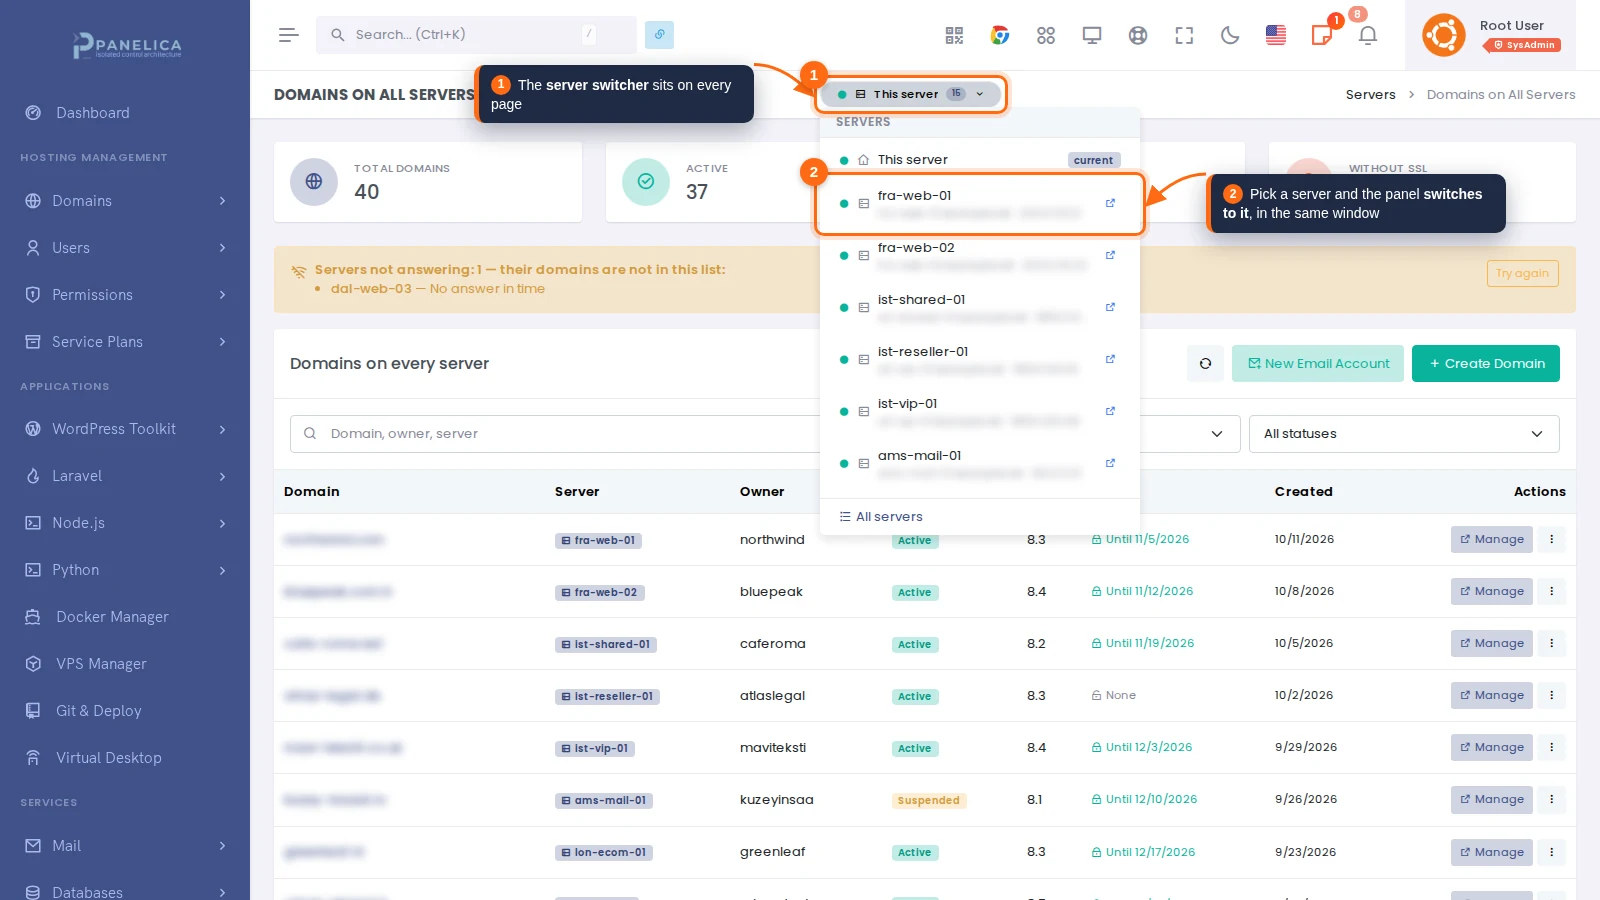
The switcher lists this server and every connected server, with its status.
A colored bar at the top always says which server you are managing, with a button back to the main panel. The dashboard, the domain list, mail, DNS, the file manager and the terminal all belong to that server now. Links, downloads, phpMyAdmin and webmail open on that server too, not on the master.
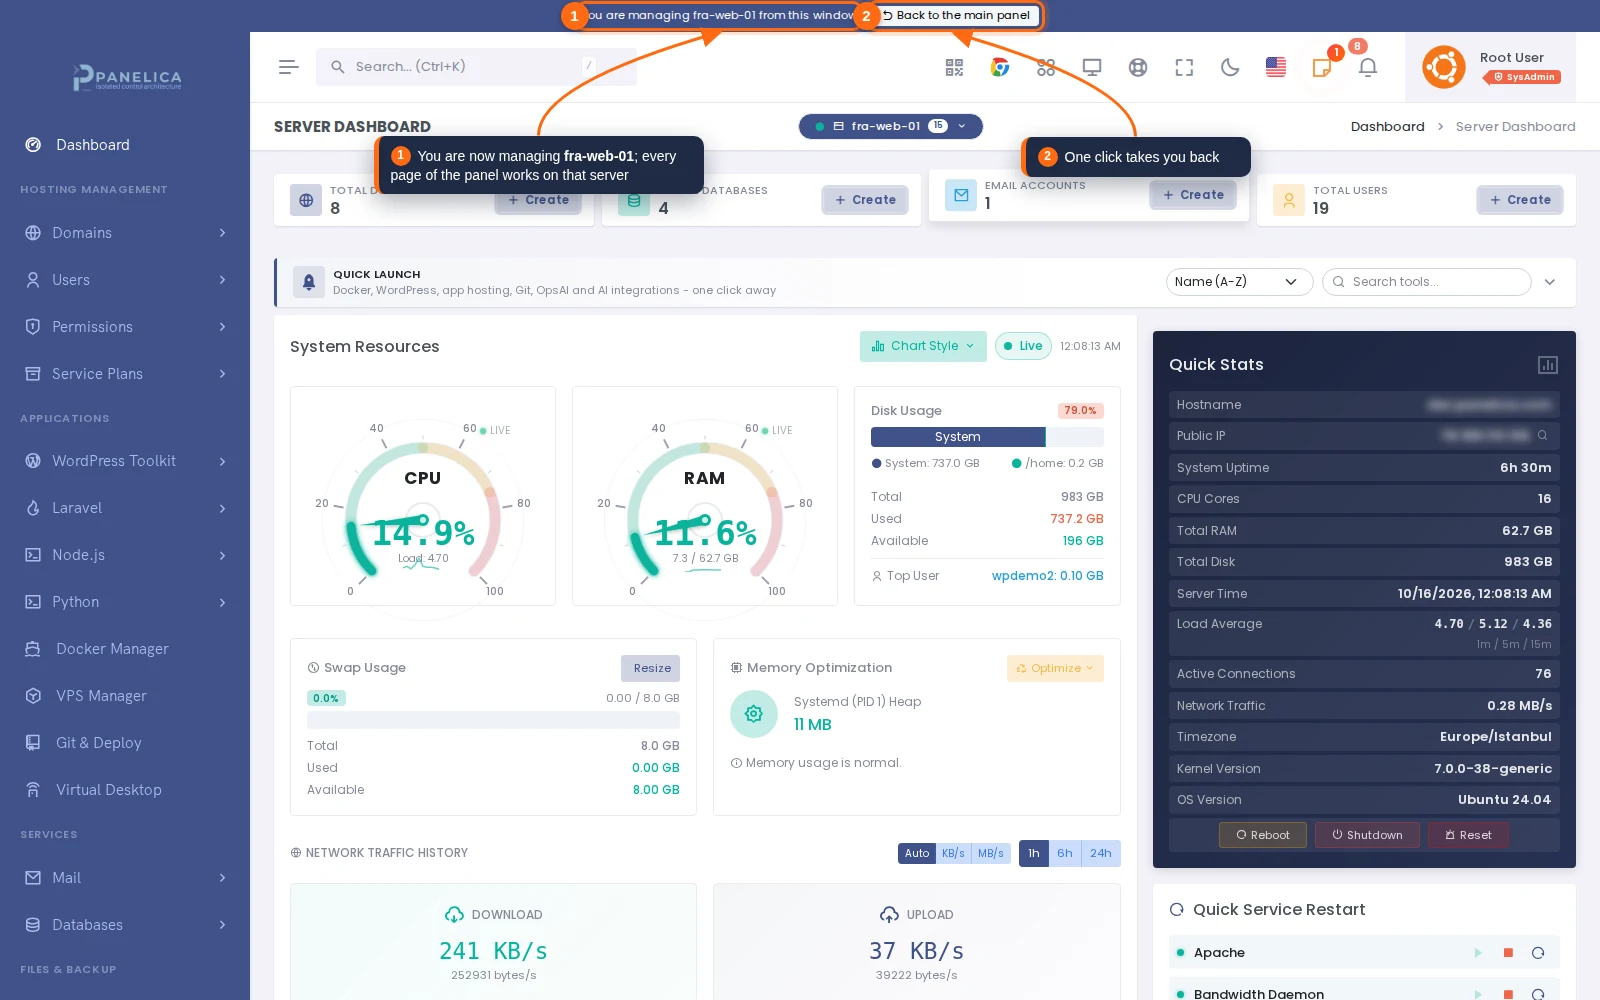
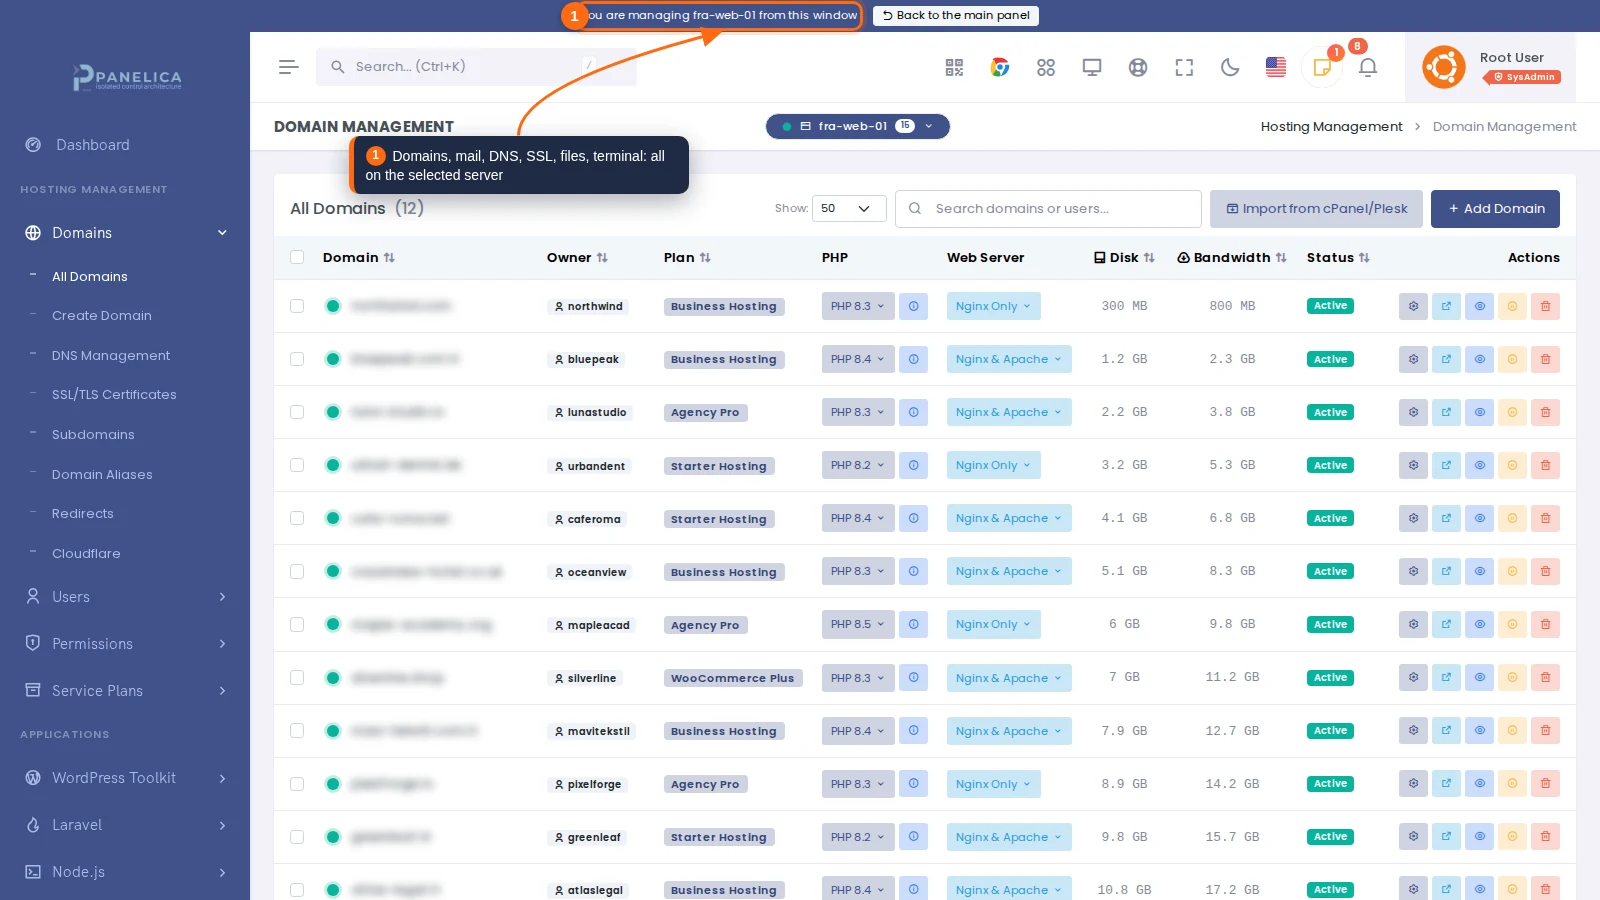
The connected server's own domains, managed from the master window. No second login.
Each browser tab keeps its own choice, so two tabs can manage two servers side by side. Your own login, profile and the Servers module always stay on the master.
Full or Limited, decided by the server. Managing a server inside the master window needs Full management, which the server grants per master on its Master Connection page. With Limited, the master can see the server, create accounts and domains, and sign in; its pages then open in the server's own panel in a new tab.
Every domain and every mailbox, across all servers
"Which server is that domain on?" is the question every multi-server operator asks several times a day. Servers › Domains answers it with one table: every domain of this panel and of every connected server, with its server, owner, status, PHP version, certificate and creation date. Filter to one server or search them all; Manage opens the domain on the server that hosts it.
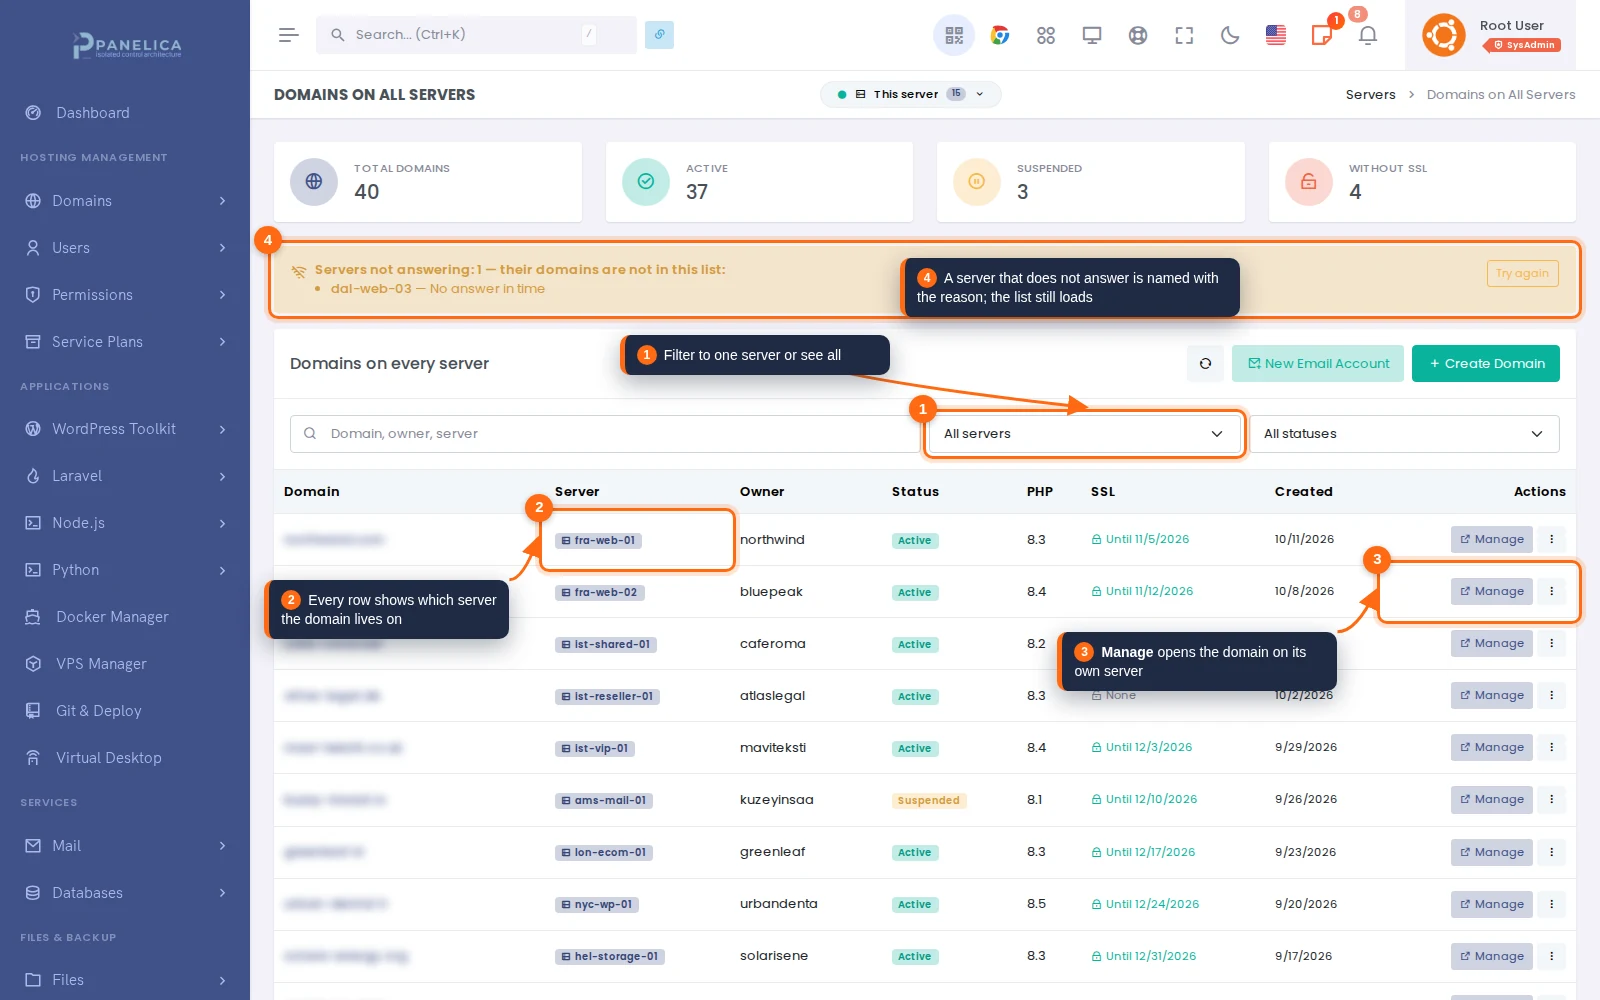
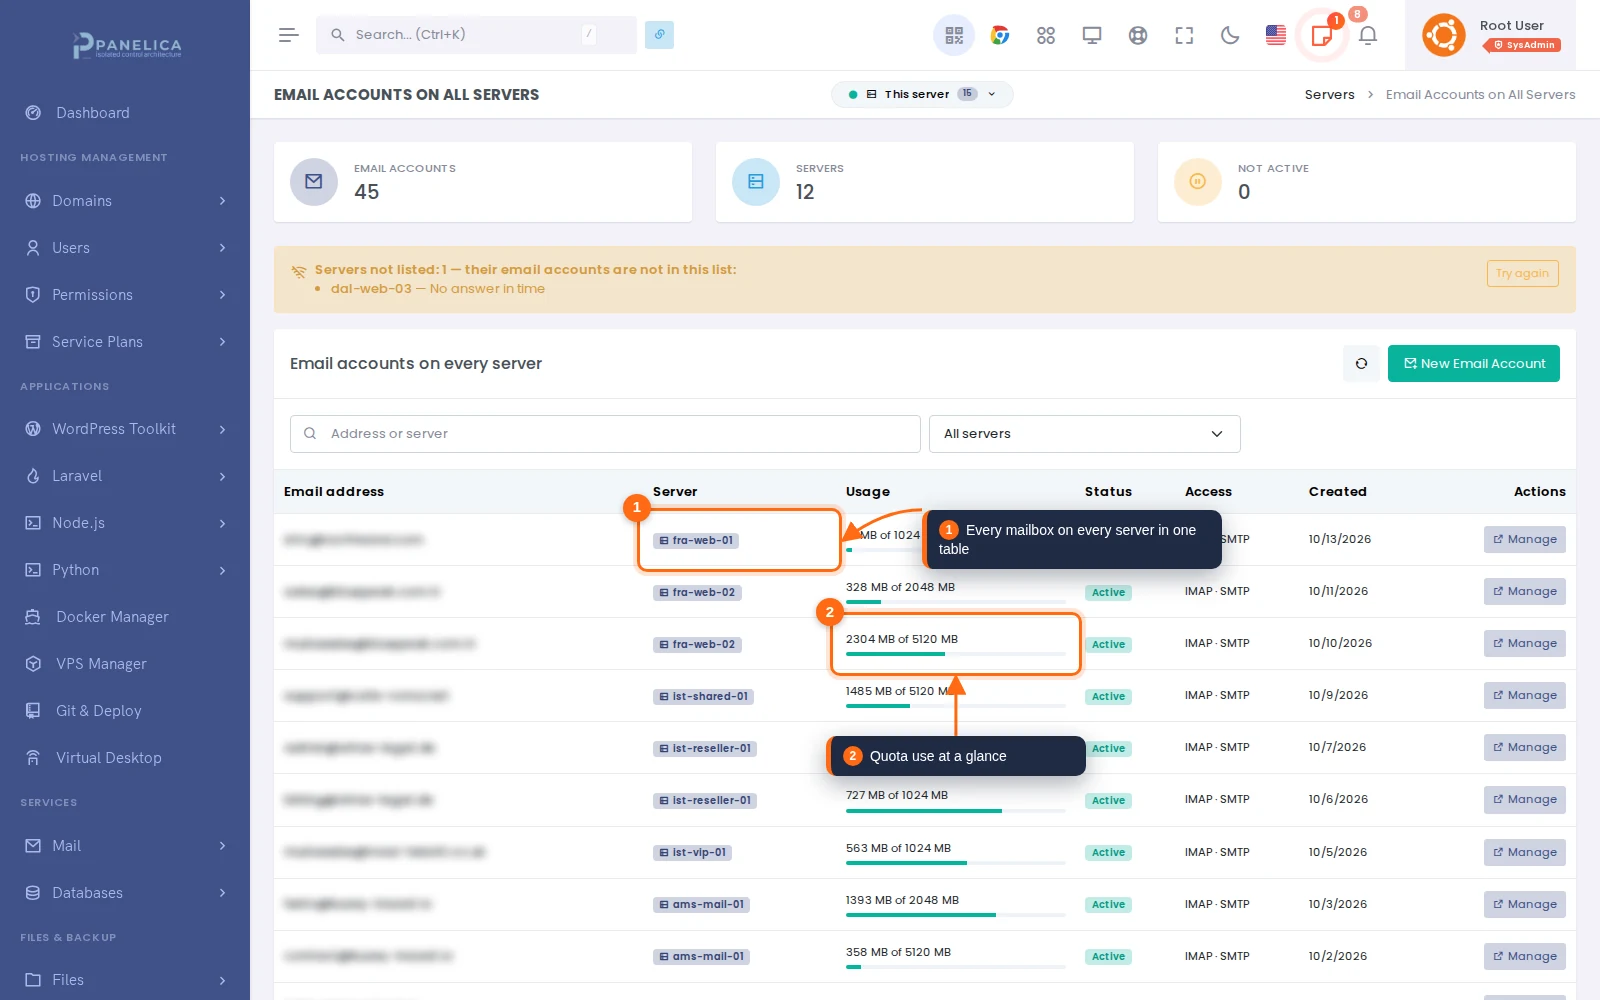
A server that does not answer is named above the table with the reason, and the rest of the list still loads. Email accounts work the same way, with quota use for every mailbox on every server.
Decide where new customers land
When servers are connected, the Create User form asks which server the account should be created on: this panel, a server you choose, or Automatic. Automatic skips servers in maintenance, servers closed to new accounts, servers that do not answer and servers above their disk threshold, then picks the one with the most free disk and RAM; on a tie, the one with fewer accounts. CPU is left out on purpose, because it swings from second to second and would make the choice random.
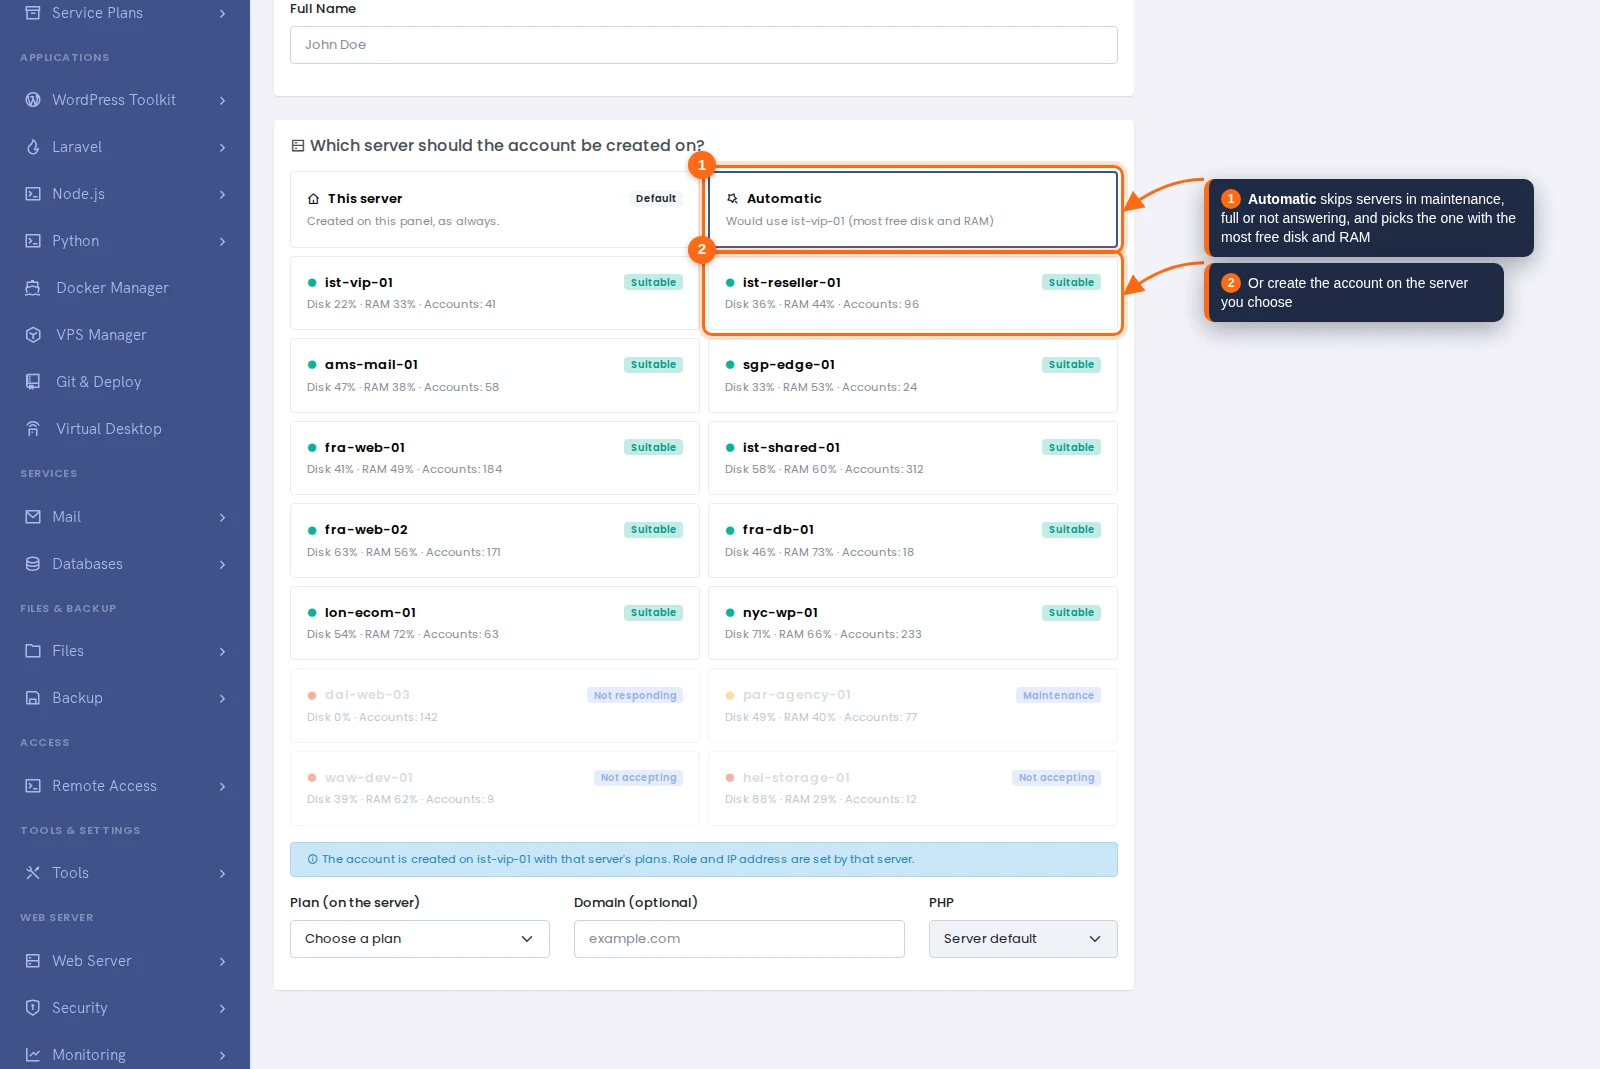
Every candidate shows its disk, RAM and account count, so the choice can be checked against the numbers.
A record of everything the master did
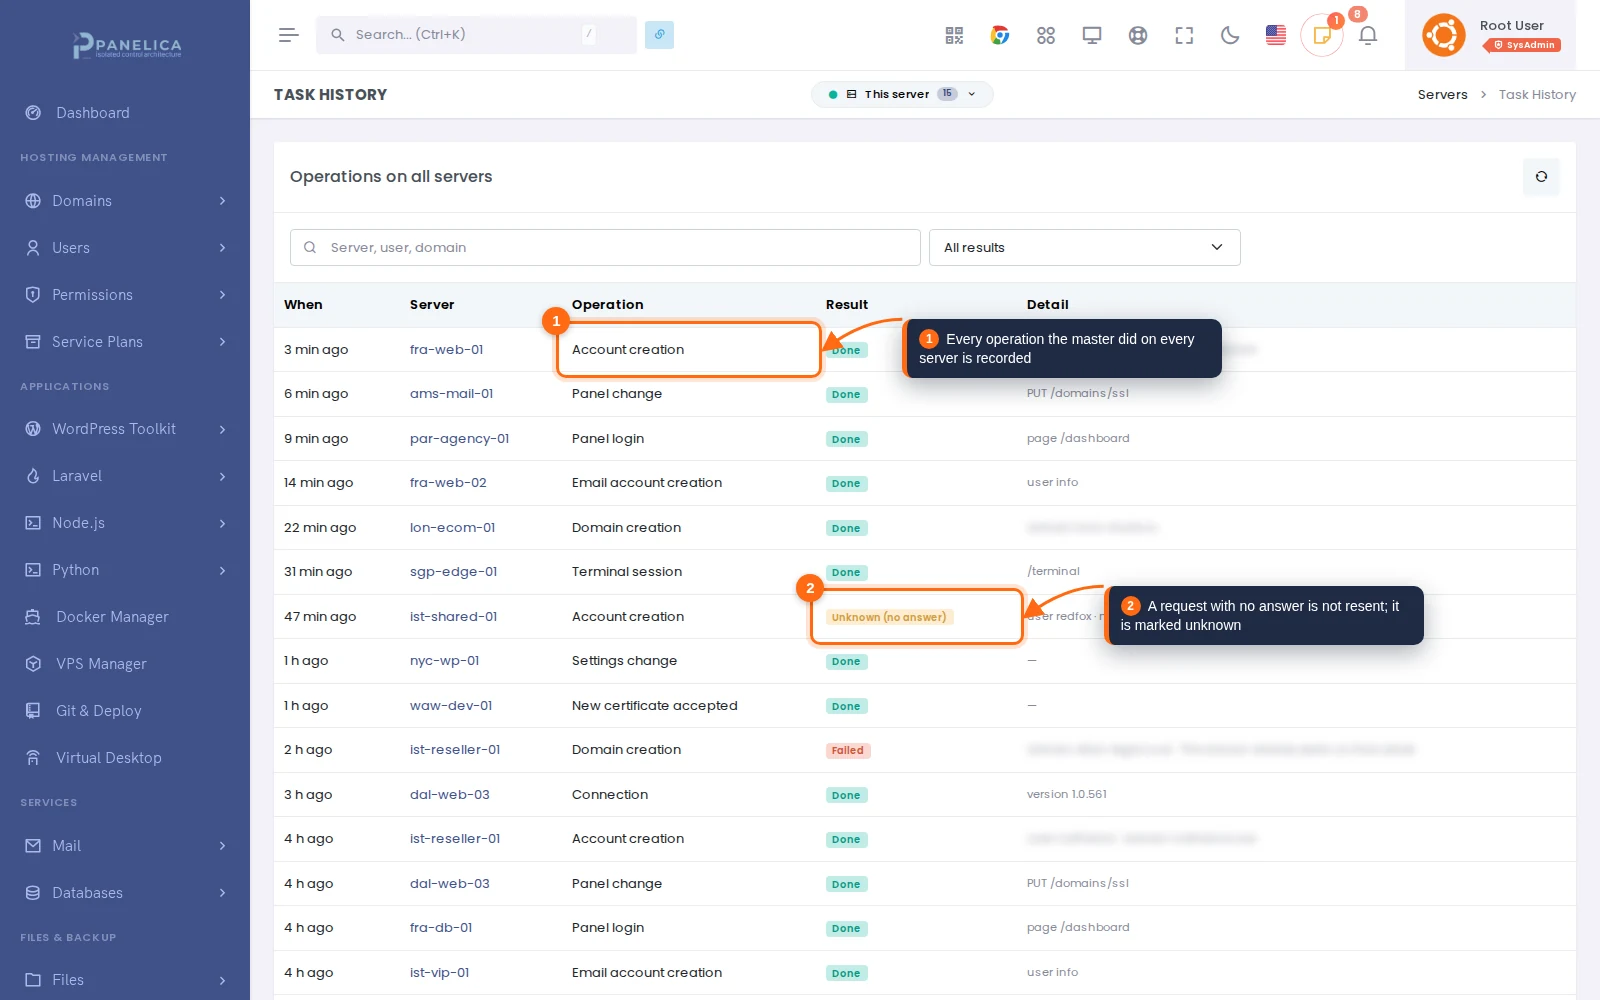
Servers › Task History records every operation the master performed on a connected server: connections, panel logins, account, domain and mailbox creation, certificate changes, settings changes and the changes made from the master window. A request whose answer never arrived is marked Unknown (no answer) and is not resent automatically; creating an account twice is worse than creating it once late.
Why remote control instead of a cluster
Clustered panels keep one database and replicate it to every node. It works until replication falls behind or breaks, and then every node is in question. Panelica takes the opposite route: each server is a complete installation with its own database, services and websites, and the master manages it the way you would, through its API.
- No single point of failure. If the master goes offline, websites, mail and DNS on the other servers keep running, and every server can still be managed from its own panel.
- No replication to babysit. Adding or removing a server never touches the others.
- Signed and pinned. After pairing, every request is HMAC-signed with a key that never crosses the network and works only from the master's IP address. The server's certificate key is pinned; a renewed certificate is trusted again only after the server proves it over the signed channel.
- The server stays in charge. It chooses Full or Limited per master, can restrict the master's IP addresses, and can disconnect a master at any time from its own panel. No SSH access is shared.
What you need
| Role | License |
|---|---|
| Master panel | Enterprise (includes the multi-server module) |
| Connected servers | Professional, Business or Enterprise |
Multi-server management is part of panelica-server since version 1.0.551 and is on the stable update channel. The 14-day trial includes both sides, so you can connect two servers and try every step above before choosing a plan. The panel's HTTPS port (8443 by default) must be reachable from the master; nothing else has to be opened between servers.
Not included yet: moving an existing account from one server to another. The master places new accounts and manages existing ones where they are.
Frequently asked questions
What happens to the websites if the master panel goes down?
Nothing. Each connected server is a complete Panelica installation that serves its own websites, mail and DNS. You lose the single window until the master is back; each server can still be managed from its own panel in the meantime.
Do I have to open SSH between my servers?
No. The master talks to each server over HTTPS on the panel port with signed requests. No SSH access, keys or passwords are shared.
Can I manage servers in different data centers or countries?
Yes. A connected server only has to be reachable from the master over HTTPS. A server behind NAT is added with its reachable address under Advanced on the Add Server page.
Can a connected server refuse the master?
Yes. The server chooses Full or Limited for each master, can limit the IP addresses a master is accepted from, and can disconnect it at any time. A disconnected master's key stops working immediately.
Is there a command line for all of this?
Yes. panelica node creates link codes and controls masters on the managed server; panelica servers adds, lists, refreshes, signs in to and removes servers on the master, and shows where a new account would be placed and why.